Video
- Initial Exam
- Initial Setup
- Visit 1
- Visit 2
- Visit 3
- Visit 4
- Visit 5
- Visit 6
- Visit 7
- Visit 8
- Visit 9
- Visit 10
- Visit 11
- Visit 12
- Visit 13
- Visit 14
- Visit 15
- Visit 16
- Visit 17
- Visit 18
- Visit 19
- Visit 20
- Visit 21
- Visit 22
- Visit 23
- Visit 24
- Visit 25
- Visit 26
- Visit 27
- Visit 28
- Visit 29
- Visit 30
- Visit 31/Gingivectomy
- Final
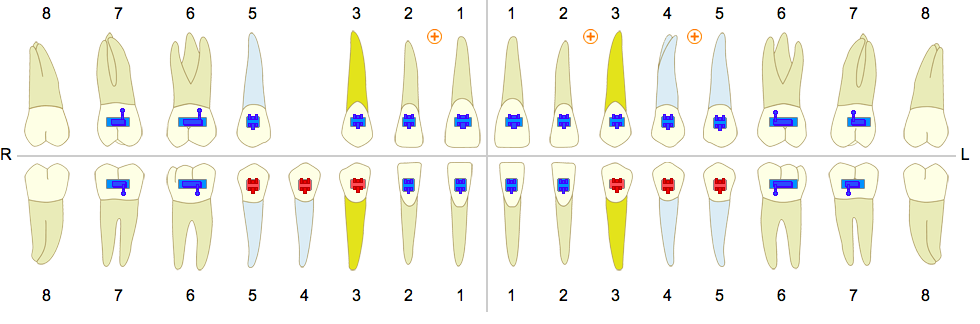
Inital Exam


Chief Complaints
Left side cant
Gummy Smile
Diagnosis
Class II right, class I left, Missing upper right 4, left side cant
Treatment Plan
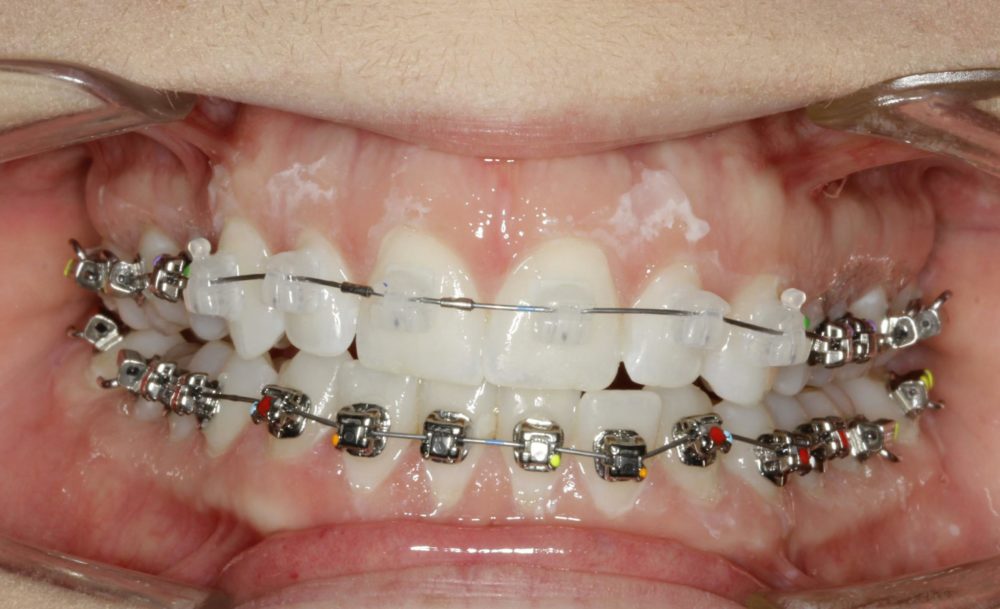
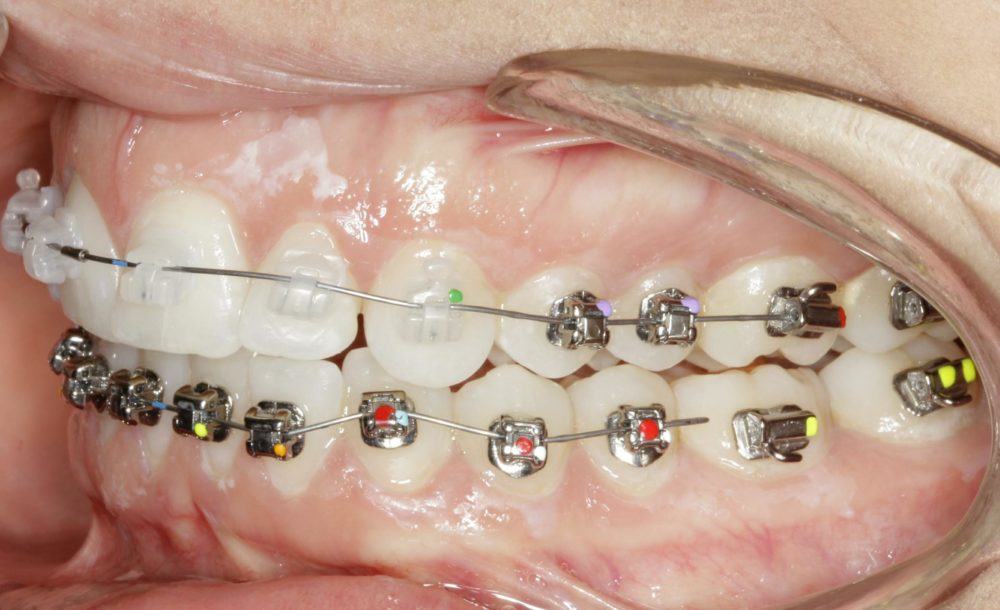
Comprehensive with upper clear and lower SS.
3 TAD’s (2 left and 1 right)
Pt. Is missing UR4 – space will be opened to correct facial midline shift, then re-close the space using a TAD (pt doesn’t want the expense or experience of an implant),
Elastics to close L-bite as we correct the cant.
Torque Selection


Upper
All regular torque on the uppers
Lower
Regular Torque 2-2
High Torque L/R 3-5
Regular Torque L/R 6-7
Wires
Upper
.014 CN
Lower
.014 CN
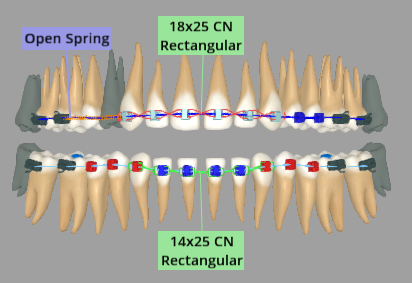
Month 1
Wire Progression
Upper: .014 Cu NiTi (Round)
Lower: .014 Cu NiTi (Round)
Brackets: Metal RT 7-7; Regular Torque Clear Bracket U 3-3
Bite Turbos: Add Bite Turbo at 19,30
*Remove Tooth at [U R/L] [L R/L] 8’s (Adult); Remove Tooth at UR4 (Adult)
Elastics
Cant to the left, 7-10mm
R jaw joint missing
2 TAD’s U-L, I TAD U-R
Pt missing UR4 – space will be opened to correct facial midline shift, then re-close the space using a TAD
2-4 Botox Injections to improve gummy smile once cant is corrected
NA ADJ SIMPLE IN 10 WEEKS
Comments
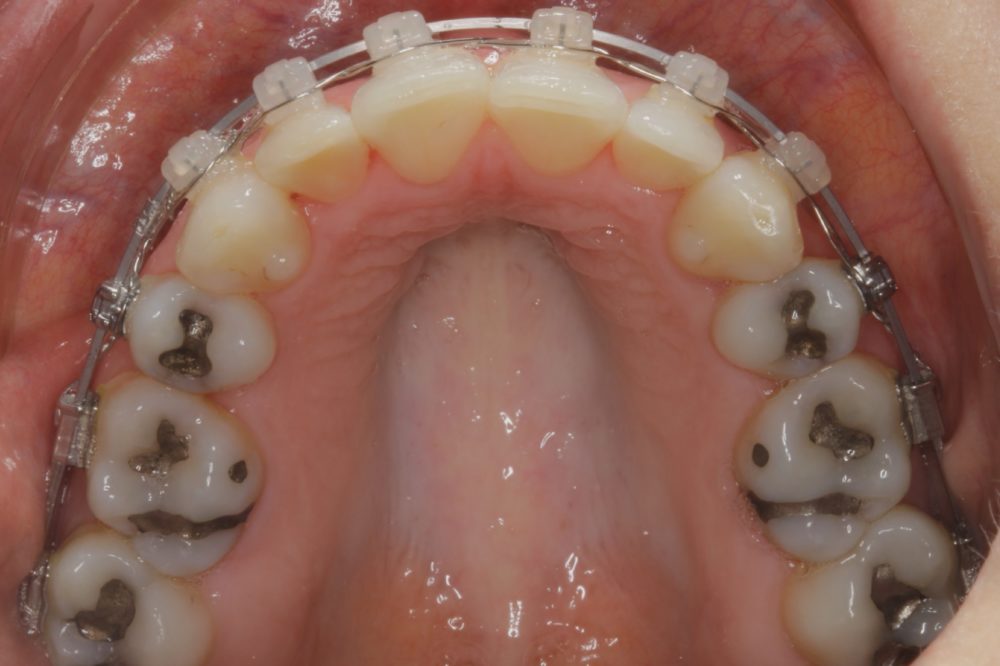
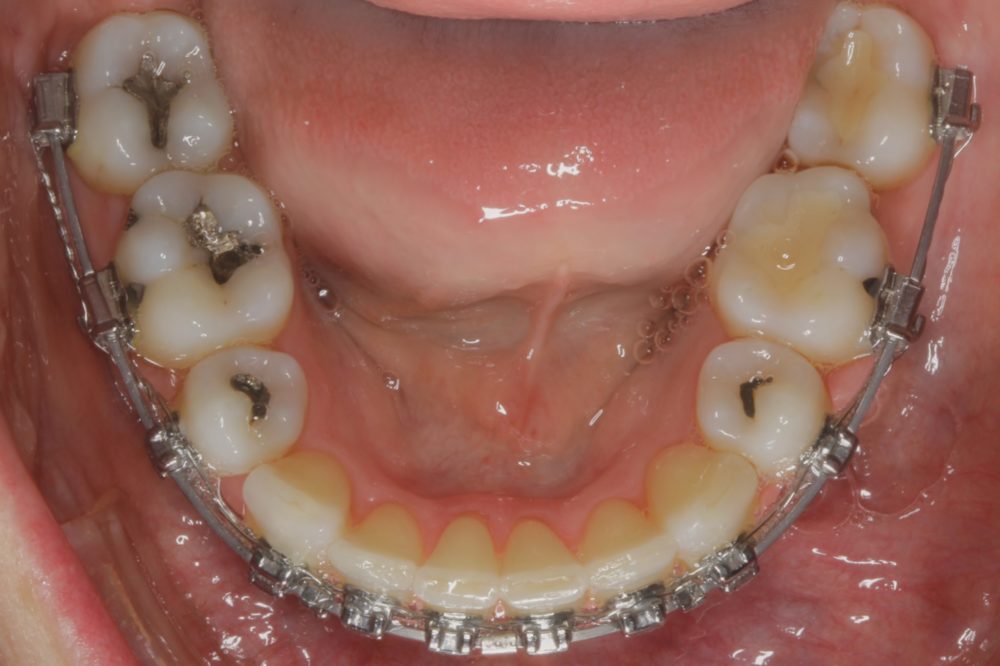
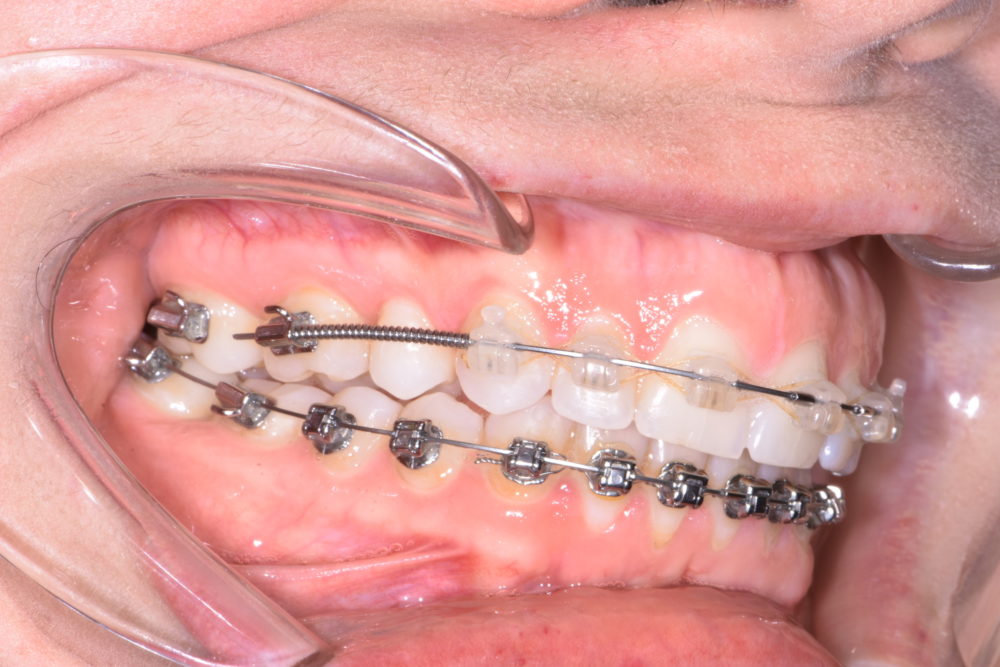
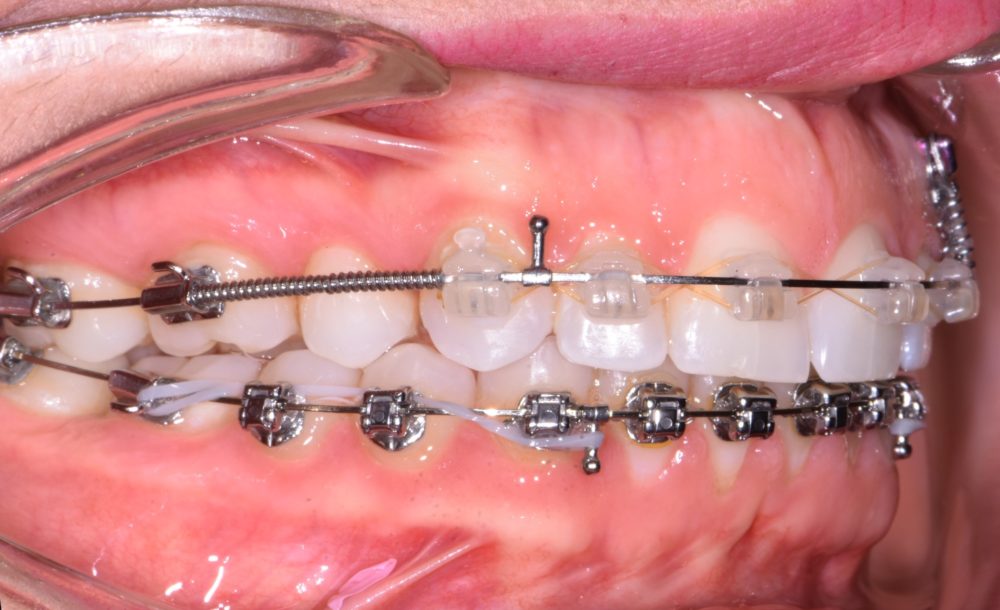
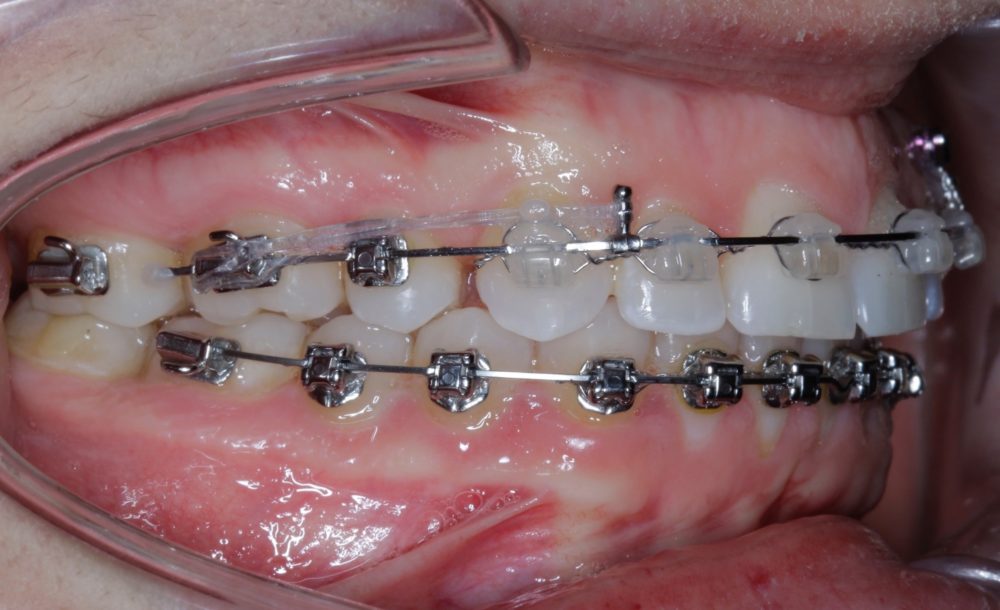
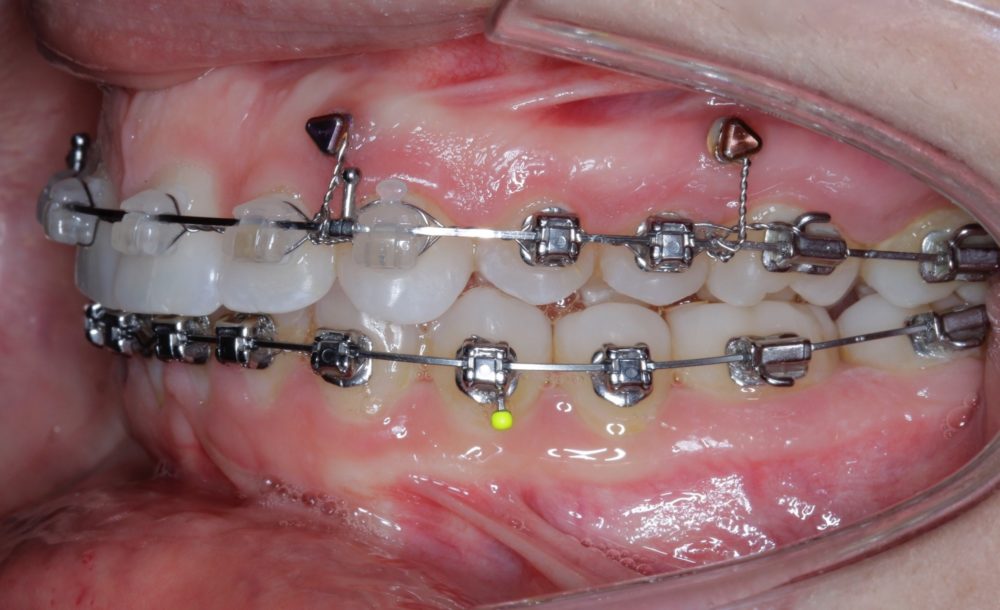
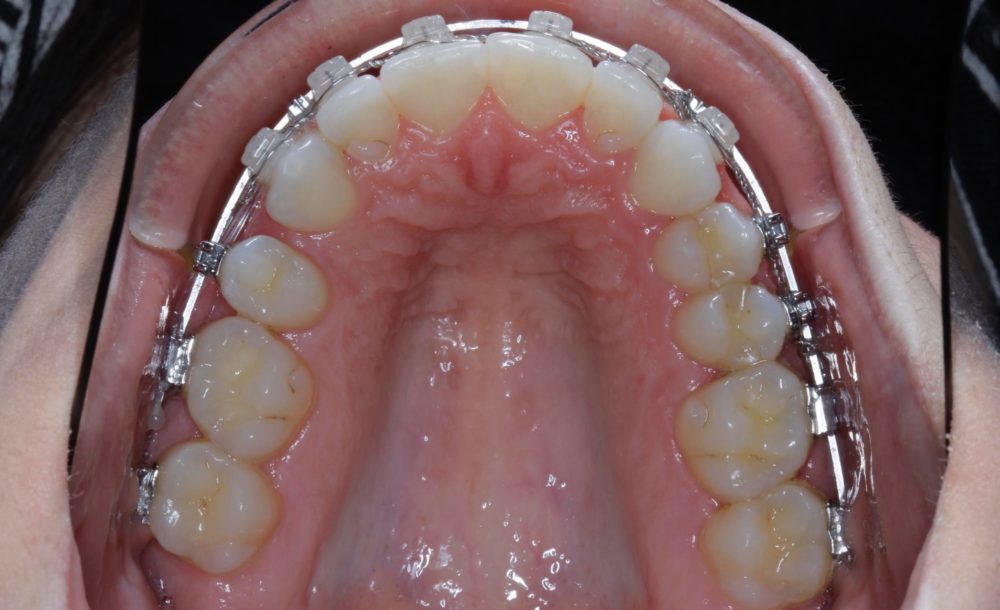
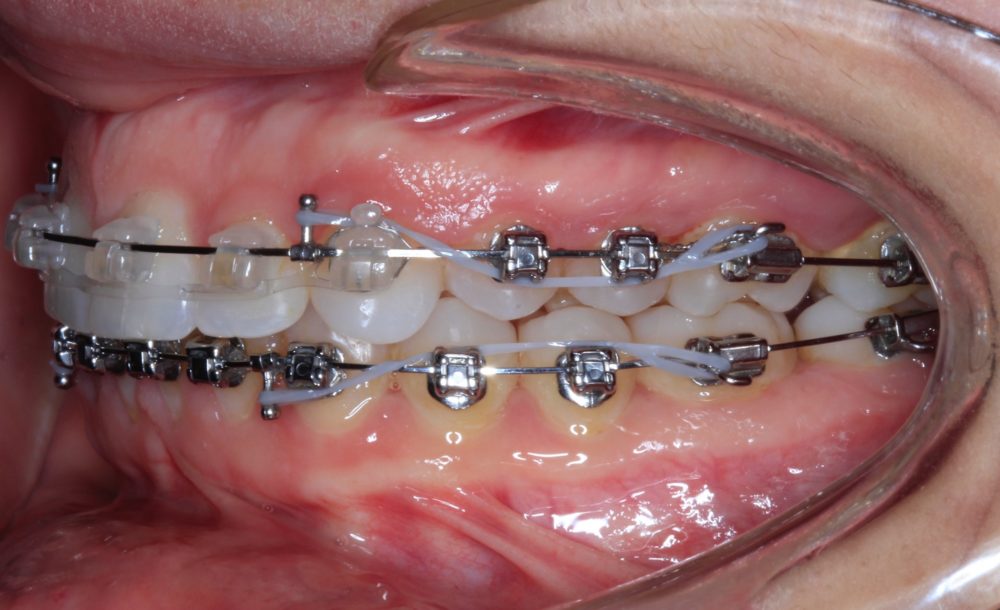
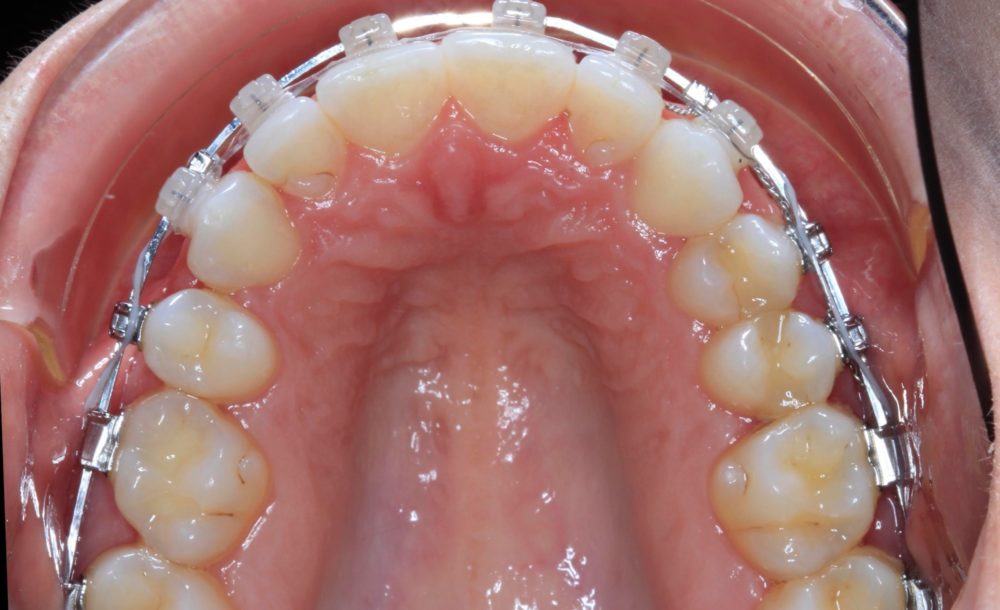
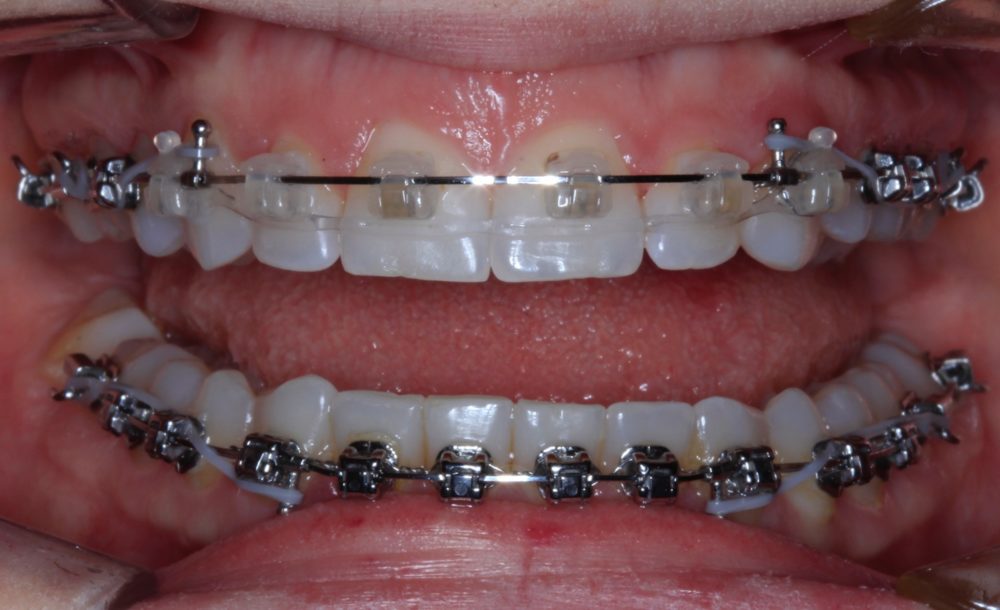
At this point, the spaces have been fully closed. Notice the width development in the upper arch.
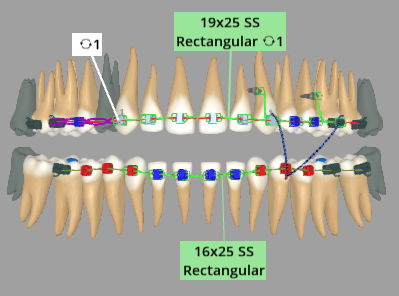
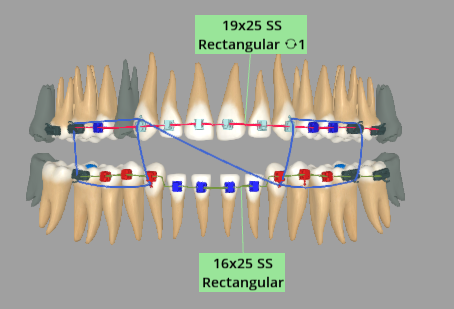
I’ve switched from a 19×25 Stainless Steel wire on top to a 19×25 TMA, and I’ve switched the lower to a 17×25 TMA as well. This will allow me to spend a few months making minor finishing adjustments.
I also wire tied upper and lower 7-7 to make sure the space doesn’t come back.
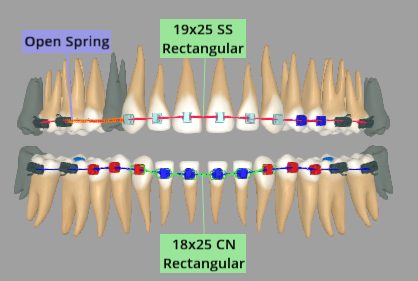
Month 2
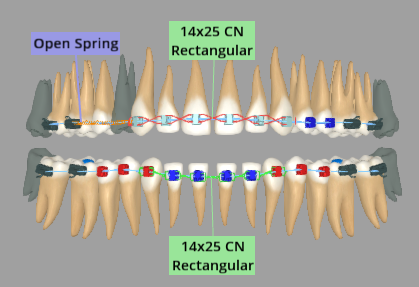

Wire Progression
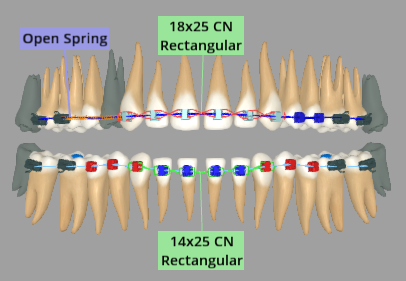
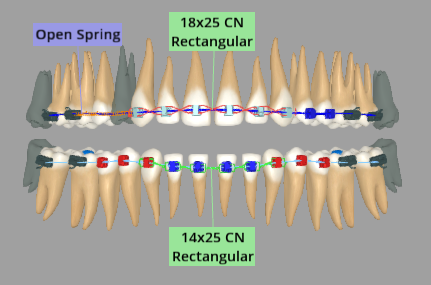
Upper: 14×25 Cu NiTi (Rectangular)
Lower: 14×25 Cu NiTi (Rectangular)
Brackets: Remove Regular Torque Metal Bracket at UR5
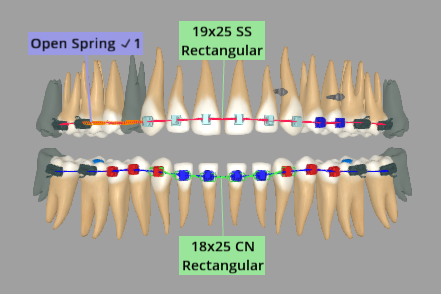
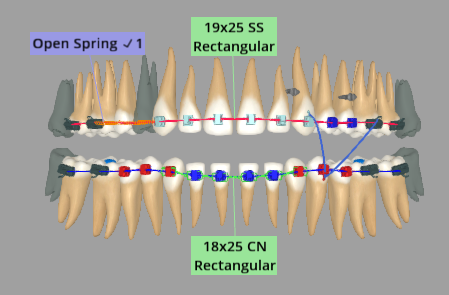
Springs: Add Spring at UR6 – UR3 (Open)
Steel Ties: Add Steel Tie at L L/R 3-3 (Braided); Add Steel Tie at U L/R 3-3 (Figureeight)
Elastics
Comments
At this point, the spaces have been fully closed. Notice the width development in the upper arch.
I’ve switched from a 19×25 Stainless Steel wire on top to a 19×25 TMA, and I’ve switched the lower to a 17×25 TMA as well. This will allow me to spend a few months making minor finishing adjustments.
I also wire tied upper and lower 7-7 to make sure the space doesn’t come back.
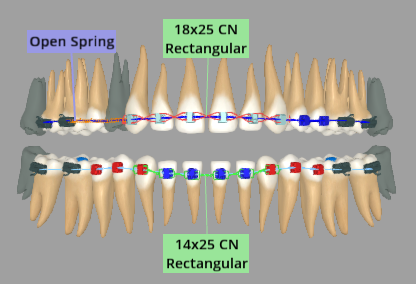
Month 3


Wire Progression
Upper: 18×25 Cu NiTi (Rectangular)
Lower: 18×25 Cu NiTi (Rectangular)
Elastics
Comments
At this point, the spaces have been fully closed. Notice the width development in the upper arch.
I’ve switched from a 19×25 Stainless Steel wire on top to a 19×25 TMA, and I’ve switched the lower to a 17×25 TMA as well. This will allow me to spend a few months making minor finishing adjustments.
I also wire tied upper and lower 7-7 to make sure the space doesn’t come back.
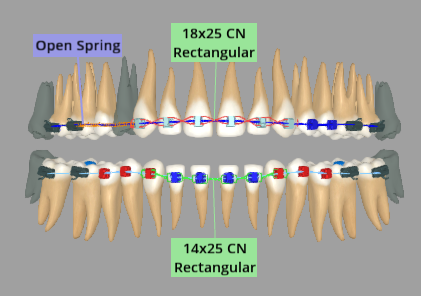
Month 3
Wire Progression
Upper: 18×25 Cu NiTi (Rectangular)
Lower: 14×25 Cu NiTi (Rectangular)
Elastics
Pt came in with LR7 bkt off. Dr. rebonded bkn bkt. I placed new LAW through LR7, old aw was too short.
Comments
At this point, the spaces have been fully closed. Notice the width development in the upper arch.
I’ve switched from a 19×25 Stainless Steel wire on top to a 19×25 TMA, and I’ve switched the lower to a 17×25 TMA as well. This will allow me to spend a few months making minor finishing adjustments.
I also wire tied upper and lower 7-7 to make sure the space doesn’t come back.
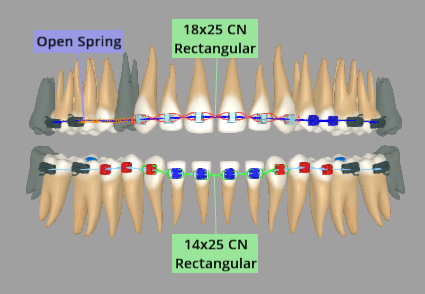
Month 3
Wire Progression
Upper: 18×25 Cu NiTi (Rectangular)
Lower: 14×25 Cu NiTi (Rectangular)
Brackets: Rebond MolarTube Bracket at LR7
Elastics
Build up on Bite turbos due to pt biting on LR7
Comments
At this point, the spaces have been fully closed. Notice the width development in the upper arch.
I’ve switched from a 19×25 Stainless Steel wire on top to a 19×25 TMA, and I’ve switched the lower to a 17×25 TMA as well. This will allow me to spend a few months making minor finishing adjustments.
I also wire tied upper and lower 7-7 to make sure the space doesn’t come back.
Month 4
Wire Progression
Upper: 18×25 Cu NiTi (Rectangular)
Lower: 14×25 Cu NiTi (Rectangular)
Elastics
U AW broke at UL3. Replace with new U18x25 Cu NiTi
Comments
At this point, the spaces have been fully closed. Notice the width development in the upper arch.
I’ve switched from a 19×25 Stainless Steel wire on top to a 19×25 TMA, and I’ve switched the lower to a 17×25 TMA as well. This will allow me to spend a few months making minor finishing adjustments.
I also wire tied upper and lower 7-7 to make sure the space doesn’t come back.
Month 4
Wire Progression
Upper: 18×25 Cu NiTi (Rectangular)
Lower: 14×25 Cu NiTi (Rectangular)
Elastics
Comments
At this point, the spaces have been fully closed. Notice the width development in the upper arch.
I’ve switched from a 19×25 Stainless Steel wire on top to a 19×25 TMA, and I’ve switched the lower to a 17×25 TMA as well. This will allow me to spend a few months making minor finishing adjustments.
I also wire tied upper and lower 7-7 to make sure the space doesn’t come back.
Month 5


Wire Progression
Upper: 18×25 Cu NiTi (Rectangular)
Lower: 14×25 Cu NiTi (Rectangular)
Brackets: Reposition Regular Torque Clear Bracket at UL1; Reposition Regular Torque Metal Bracket at LL1
Elastics
Repoed UL1 and LL1. same aw’s. Dr. likes pts progress
Comments
At this point, the spaces have been fully closed. Notice the width development in the upper arch.
I’ve switched from a 19×25 Stainless Steel wire on top to a 19×25 TMA, and I’ve switched the lower to a 17×25 TMA as well. This will allow me to spend a few months making minor finishing adjustments.
I also wire tied upper and lower 7-7 to make sure the space doesn’t come back.
Month 6
Wire Progression
Upper: 18×25 Cu NiTi (Rectangular)
Lower: 14×25 Cu NiTi (Rectangular)
Elastics
L AW broke between LL7 LL6. Replace with new 14×25 Cu NiTi
Comments
At this point, the spaces have been fully closed. Notice the width development in the upper arch.
I’ve switched from a 19×25 Stainless Steel wire on top to a 19×25 TMA, and I’ve switched the lower to a 17×25 TMA as well. This will allow me to spend a few months making minor finishing adjustments.
I also wire tied upper and lower 7-7 to make sure the space doesn’t come back.
Month 7
Wire Progression
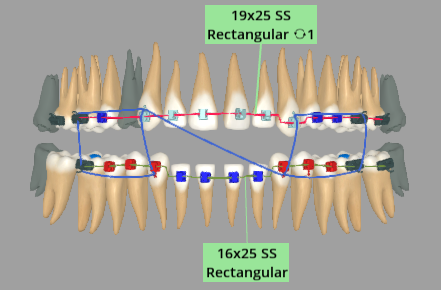
Upper: 19×25 SS (Rectangular)
Lower: 18×25 Cu NiTi (Rectangular)
Brackets: Rebond MolarTube Bracket at LR7
Steel Ties: Remove Steel Tie at U R/L 3-3 (Figureeight)
Elastics
L AW broke between LL7 LL6. Replace with new 14×25 Cu NiTi
Comments
At this point, the spaces have been fully closed. Notice the width development in the upper arch.
I’ve switched from a 19×25 Stainless Steel wire on top to a 19×25 TMA, and I’ve switched the lower to a 17×25 TMA as well. This will allow me to spend a few months making minor finishing adjustments.
I also wire tied upper and lower 7-7 to make sure the space doesn’t come back.
Month 8
Wire Progression
Upper: 19×25 SS (Rectangular)
Lower: 18×25 Cu NiTi (Rectangular)
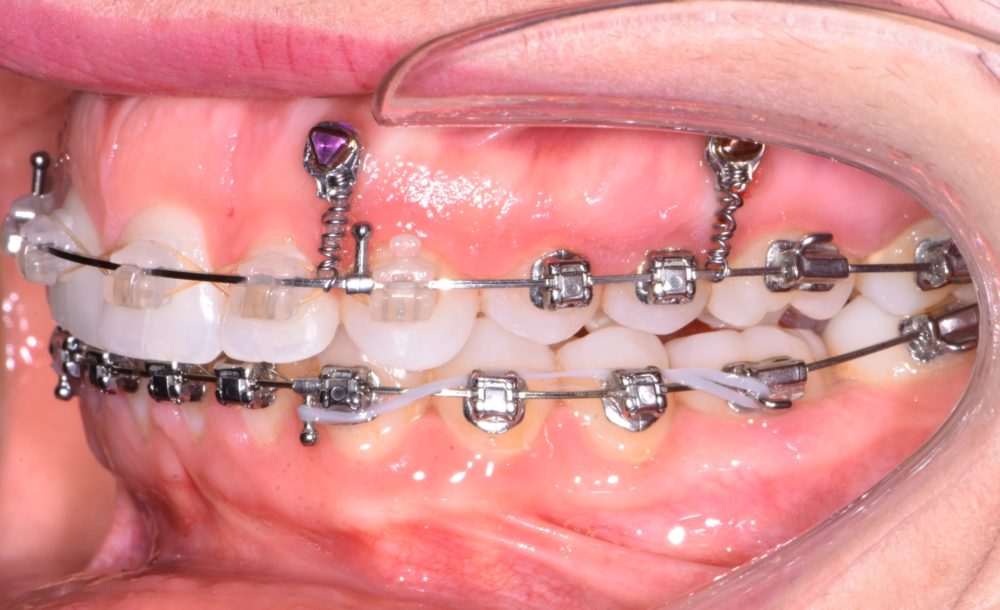
TADs: Add TAD at UL 2-3,UL 4-5 (Buccal)
Elastics
Used lidocaine topical to place a TAD medial to UL3 and medial to UL6
hooked up 150g 10mm vector springs to intrude upper arch
replace LAW
activated OCS on UR side from UR3-UR6
Comments
At this point, the spaces have been fully closed. Notice the width development in the upper arch.
I’ve switched from a 19×25 Stainless Steel wire on top to a 19×25 TMA, and I’ve switched the lower to a 17×25 TMA as well. This will allow me to spend a few months making minor finishing adjustments.
I also wire tied upper and lower 7-7 to make sure the space doesn’t come back.
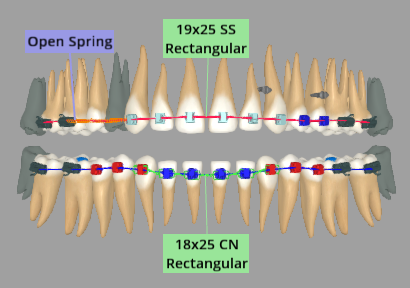
Month 10


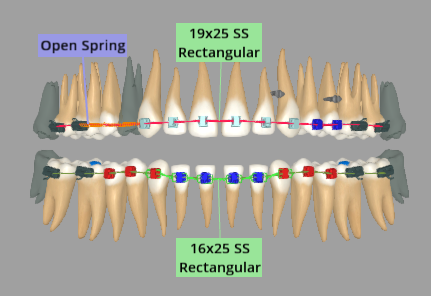


Wire Progression
Upper: 19×25 SS (Rectangular)
Lower: 16×25 SS (Rectangular)
Springs: Replace Spring at UR3-UR6 (Open)
Elastics
Switched out vector springs to 5mm 250mg on UL side. Took progress photos
Comments
At this point, the spaces have been fully closed. Notice the width development in the upper arch.
I’ve switched from a 19×25 Stainless Steel wire on top to a 19×25 TMA, and I’ve switched the lower to a 17×25 TMA as well. This will allow me to spend a few months making minor finishing adjustments.
I also wire tied upper and lower 7-7 to make sure the space doesn’t come back.
Month 11
Wire Progression
Upper: 19×25 SS (Rectangular)
Lower: 18×25 Cu NiTi (Rectangular)
Springs: Changed Spring at UR6-UR3 (Open)
Elastics
Comments
At this point, the spaces have been fully closed. Notice the width development in the upper arch.
I’ve switched from a 19×25 Stainless Steel wire on top to a 19×25 TMA, and I’ve switched the lower to a 17×25 TMA as well. This will allow me to spend a few months making minor finishing adjustments.
I also wire tied upper and lower 7-7 to make sure the space doesn’t come back.
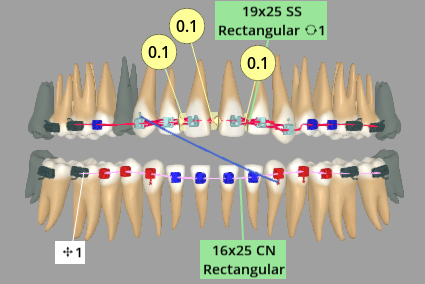
Month 12


Wire Progression
Upper: 19×25 SS (Rectangular)
Lower: 18×25 Cu NiTi (Rectangular)
Bracket Hooks: Add Bracket Hook at LL4, UL3
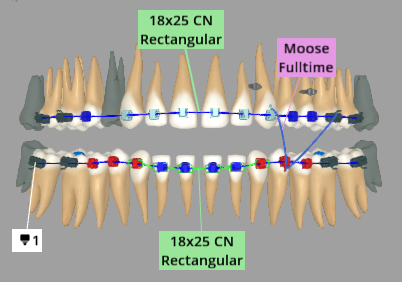
Elastic Bands: Add Moose at UL6-LL4-UL3-LL4 (Fulltime)
Elastics
Removed springs, wire tie to TAD. start elastics today to help L side occlude. next visit we will bond UR4 and start closing space. midlines are on.
Comments
At this point, the spaces have been fully closed. Notice the width development in the upper arch.
I’ve switched from a 19×25 Stainless Steel wire on top to a 19×25 TMA, and I’ve switched the lower to a 17×25 TMA as well. This will allow me to spend a few months making minor finishing adjustments.
I also wire tied upper and lower 7-7 to make sure the space doesn’t come back.
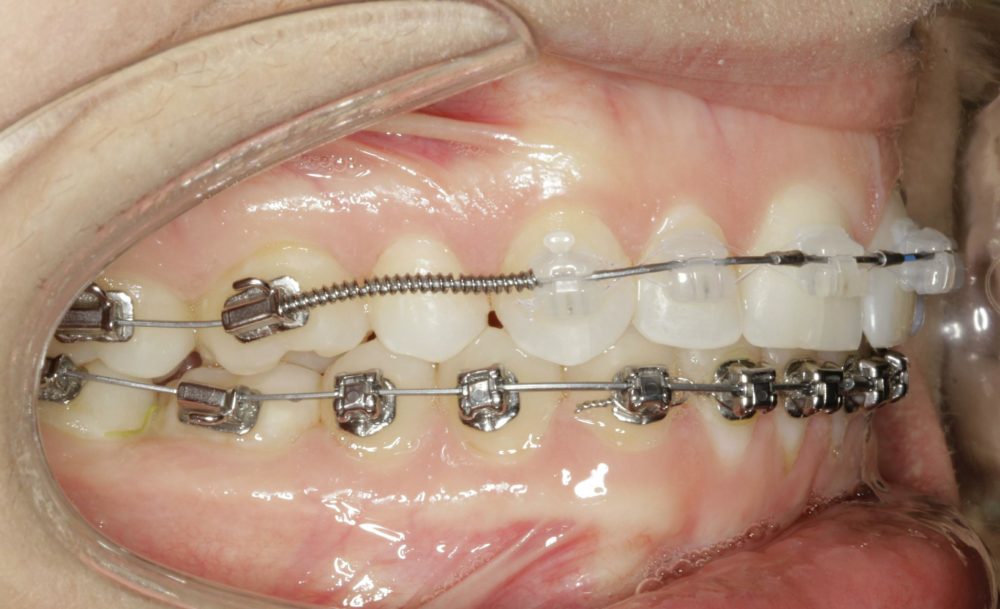
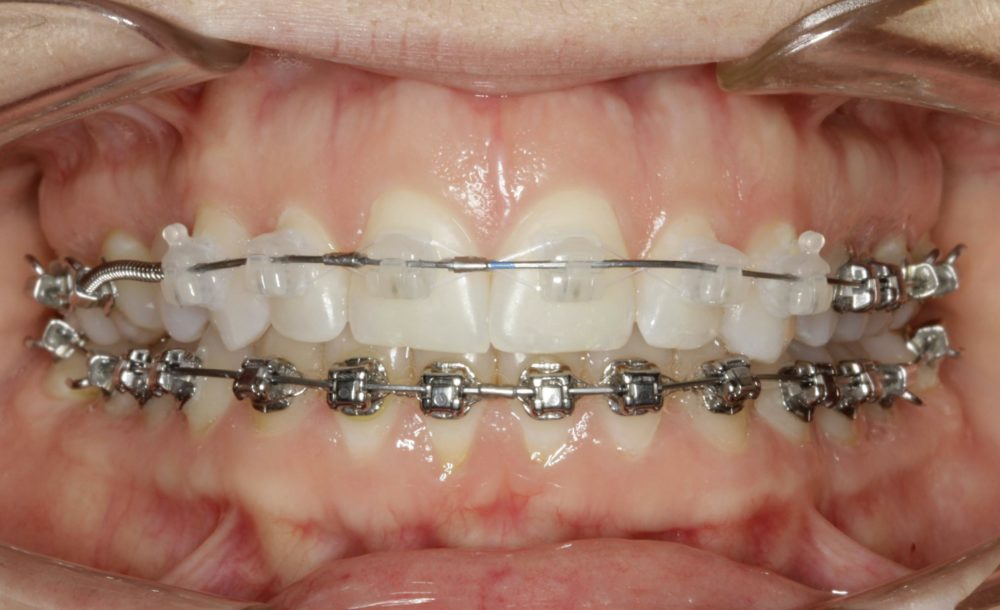
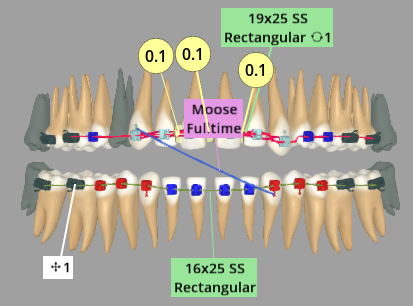
Month 13
Wire Progression
Upper: 18×25 Cu NiTi (Rectangular)
Lower: 18×25 Cu NiTi (Rectangular)
Brackets: Rebond MolarTube Bracket at LR7; Update Regular Torque Metal Bracket at UR5
Springs: Remove Spring at UR6-UR3 (Open)
Elastics
N/V: Non-Doc 30. Remove UAW and Replace with Pt’s 19×25 SS. (AW in Jess’s chair). Tie both UL TAD’s back to UAW. Resume Elastic Wear.
NN/V: Adj Com 45. Add additional TAD. Check midline and elastic wear.
**NOTE** With the numbing gel, Use LESS amount of time than regularly allotted, Pt has reaction to gel, and last time it was used for the full amount of time, her skin sloughed off were the gel was, painful.
Comments
At this point, the spaces have been fully closed. Notice the width development in the upper arch.
I’ve switched from a 19×25 Stainless Steel wire on top to a 19×25 TMA, and I’ve switched the lower to a 17×25 TMA as well. This will allow me to spend a few months making minor finishing adjustments.
I also wire tied upper and lower 7-7 to make sure the space doesn’t come back.
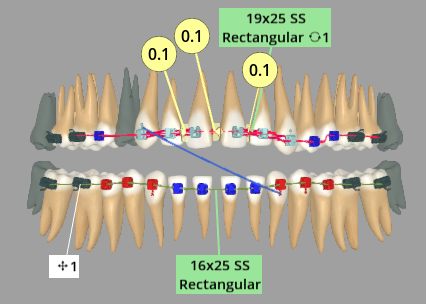
Month 13
Wire Progression
Upper: 19×25 SS (Rectangular)
Lower: 18×25 Cu NiTi (Rectangular)
Wire Hooks: Add Wire Hook at UL2-UL3, UL5-UL6
Steel Ties: Add Steel Tie at TAD-AWHook(LL 2-3), AWHook(LR 1-2)-TAD (Braided)
Elastics
Comments
At this point, the spaces have been fully closed. Notice the width development in the upper arch.
I’ve switched from a 19×25 Stainless Steel wire on top to a 19×25 TMA, and I’ve switched the lower to a 17×25 TMA as well. This will allow me to spend a few months making minor finishing adjustments.
I also wire tied upper and lower 7-7 to make sure the space doesn’t come back.
Month 15

Wire Progression
Upper: 19×25 SS (Rectangular)
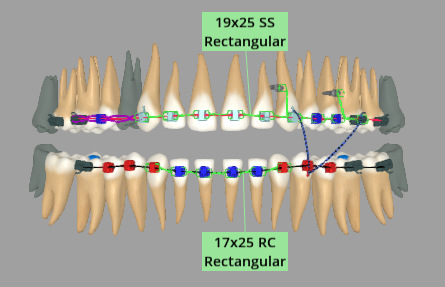
Lower: 17×25 RC (Rectangular)
Brackets: Remove MolarTube Bracket at LR7
Bracket Hooks: Add Bracket Hook at UR3
Wire Hooks: Add Wire Hook at UR4-UR3; Remove Wire Hook at UL2-UL3, UL5-UL6, UR4-UR3
Elastic Bands: Update Moose at UL6-LL4-UL3-LL4 (Nighttime)
C-Chains: Add C-Chain at UR6-UR3-UR6 (Closed, Over)
Steel Ties: Add Steel Tie at UL3-TAD, UL5-TAD, UR3-UL6 (Braided, Over); Remove Steel Tie at TAD-AWHook(LL 2-3), AWHook(LR 1-2)-TAD (Braided)
Elastics
Most of space closed up on its own on UR side. dr checked midline and it is spot on. dr does not want to place TAD anymore. cut wire UR side not going to the 7 and placed slingback from end of wire up to post back to end of wire on UR side. wire tied from UR3-UL6 per dr. we will see pt back in 4 weeks to check spacing of UR side. took photos today
Comments
At this point, the spaces have been fully closed. Notice the width development in the upper arch.
I’ve switched from a 19×25 Stainless Steel wire on top to a 19×25 TMA, and I’ve switched the lower to a 17×25 TMA as well. This will allow me to spend a few months making minor finishing adjustments.
I also wire tied upper and lower 7-7 to make sure the space doesn’t come back.
Month 15
Wire Progression
Upper: 19×25 SS (Rectangular)
Lower: 17×25 RC (Rectangular)
C-Chains: Replace C-Chain at UR6-UR3-UR6 (Closed, Over)
Elastics
Comments
At this point, the spaces have been fully closed. Notice the width development in the upper arch.
I’ve switched from a 19×25 Stainless Steel wire on top to a 19×25 TMA, and I’ve switched the lower to a 17×25 TMA as well. This will allow me to spend a few months making minor finishing adjustments.
I also wire tied upper and lower 7-7 to make sure the space doesn’t come back.
Month 16
Wire Progression
Upper: 19×25 SS (Rectangular)
Lower: 16×25 SS (Rectangular)
Elastics
Widened upper AW and retied tads. dr wants to leave tads in for this apt to help finish bringing together bite bit NA pt is ready to rmove tads, pt is to continue with 6-4-3 elastics.
Comments
At this point, the spaces have been fully closed. Notice the width development in the upper arch.
I’ve switched from a 19×25 Stainless Steel wire on top to a 19×25 TMA, and I’ve switched the lower to a 17×25 TMA as well. This will allow me to spend a few months making minor finishing adjustments.
I also wire tied upper and lower 7-7 to make sure the space doesn’t come back.
Month 16
Wire Progression
Upper: 19×25 SS (Rectangular)
Lower: 16×25 SS (Rectangular)
Elastics
Pt came in with wire broken on U, removed rest of remaining wire and replaced. wire tie tads to wire
Comments
At this point, the spaces have been fully closed. Notice the width development in the upper arch.
I’ve switched from a 19×25 Stainless Steel wire on top to a 19×25 TMA, and I’ve switched the lower to a 17×25 TMA as well. This will allow me to spend a few months making minor finishing adjustments.
I also wire tied upper and lower 7-7 to make sure the space doesn’t come back.
Month 17

Wire Progression
Upper: 19×25 SS (Rectangular)
Lower: 16×25 SS (Rectangular)
Bracket Hooks: Add Bracket Hook at LL3
Elastic Bands: Remove Moose at UL3-UL6-LL4-LL4 ; Add Moose at UR3-LL3 (Fulltime)
Steel Ties: Remove All Steel Tie
TADs: Remove All TAD
Elastics
Comments
At this point, the spaces have been fully closed. Notice the width development in the upper arch.
I’ve switched from a 19×25 Stainless Steel wire on top to a 19×25 TMA, and I’ve switched the lower to a 17×25 TMA as well. This will allow me to spend a few months making minor finishing adjustments.
I also wire tied upper and lower 7-7 to make sure the space doesn’t come back.
Month 18

Wire Progression
Upper: 19×25 SS (Rectangular)
Lower: 16×25 SS (Rectangular)
Bends: Add Bend at UL1 (Upper, MesialIn); Add Bend at LL2-LR2 (Lower, IntrusionStep)
Bracket Hooks: Add Bracket Hook at LR3
Elastic Bands: Add Box (Moose) (Fulltime, Both)
C-Chains: Remove C-Chain at UR6-UR3 (Closed, Over)
Elastics
Comments
At this point, the spaces have been fully closed. Notice the width development in the upper arch.
I’ve switched from a 19×25 Stainless Steel wire on top to a 19×25 TMA, and I’ve switched the lower to a 17×25 TMA as well. This will allow me to spend a few months making minor finishing adjustments.
I also wire tied upper and lower 7-7 to make sure the space doesn’t come back.
Month 19

Wire Progression
Upper: 19×25 SS (Rectangular)
Lower: 16×25 SS (Rectangular)
Bends: Remove Mesial Out Bend [UL1]; Add Bend at UL1 (Upper, MesialOut); Add Bend at UL3 (Upper, ExtrusionStep)
Elastics
Replaced sling U3-3. Dr wants for one more apt. Took updated photos
Comments
At this point, the spaces have been fully closed. Notice the width development in the upper arch.
I’ve switched from a 19×25 Stainless Steel wire on top to a 19×25 TMA, and I’ve switched the lower to a 17×25 TMA as well. This will allow me to spend a few months making minor finishing adjustments.
I also wire tied upper and lower 7-7 to make sure the space doesn’t come back.
Month 20

Wire Progression
Upper: 19×25 SS (Rectangular)
Lower: 18×25 Cu NiTi (Rectangular)
Brackets: Add MolarTube Bracket at LR7
Bends: Remove Intrusion Step Bend [LL2-LR2]; Add Bend at UR1 (Upper, MesialOut)
Elastic Bands: Remove Box (Fulltime, Both)
C-Chains: Add C-Chain at UR3-UL3 (Closed, Under)
Bite Turbos: Remove Bite Turbo at LL6,LR6; Add Bite Turbo at LR7
Elastics
Bite was not settling Dr contoured UR side of occlusal surface. rebonded LR7. Place a BT on LR7 to help intrude it and so pt wasnt hitting bracket.
NA we will remove it if pt is not going to hit brkt.
Comments
At this point, the spaces have been fully closed. Notice the width development in the upper arch.
I’ve switched from a 19×25 Stainless Steel wire on top to a 19×25 TMA, and I’ve switched the lower to a 17×25 TMA as well. This will allow me to spend a few months making minor finishing adjustments.
I also wire tied upper and lower 7-7 to make sure the space doesn’t come back.
Month 21


Wire Progression
Upper: 19×25 SS (Rectangular)
Lower: 16×25 SS (Rectangular)
Elastics
PLACED SLING U3-3 (AROUND UL3, UNDER, THEN AROUND UR2,3)
TOOK PROGRESS PHOTOS
Comments
At this point, the spaces have been fully closed. Notice the width development in the upper arch.
I’ve switched from a 19×25 Stainless Steel wire on top to a 19×25 TMA, and I’ve switched the lower to a 17×25 TMA as well. This will allow me to spend a few months making minor finishing adjustments.
I also wire tied upper and lower 7-7 to make sure the space doesn’t come back.
Month 22
Wire Progression
Upper: 19×25 SS (Rectangular)
Lower: 16×25 Cu NiTi (Rectangular)
Brackets: Reposition MolarTube Bracket at LR6
Bite Turbos: Remove Bite Turbo at LR7
IPRs: Add IPR at UR2-UR1, UR1-UL1, UL1-UL2 (Both, 0.1mm)
Elastics
Place snaplink on LR6
Place 18×25 cn to catch that snap link
Comments
At this point, the spaces have been fully closed. Notice the width development in the upper arch.
I’ve switched from a 19×25 Stainless Steel wire on top to a 19×25 TMA, and I’ve switched the lower to a 17×25 TMA as well. This will allow me to spend a few months making minor finishing adjustments.
I also wire tied upper and lower 7-7 to make sure the space doesn’t come back.
Month 22

Wire Progression
Upper: 19×25 SS (Rectangular)
Lower: 16×25 Cu NiTi (Rectangular)
Elastics
Comments
At this point, the spaces have been fully closed. Notice the width development in the upper arch.
I’ve switched from a 19×25 Stainless Steel wire on top to a 19×25 TMA, and I’ve switched the lower to a 17×25 TMA as well. This will allow me to spend a few months making minor finishing adjustments.
I also wire tied upper and lower 7-7 to make sure the space doesn’t come back.
Month 22
Wire Progression
Upper: 19×25 SS (Rectangular)
Lower: 16×25 SS (Rectangular)
Elastics
Comments
At this point, the spaces have been fully closed. Notice the width development in the upper arch.
I’ve switched from a 19×25 Stainless Steel wire on top to a 19×25 TMA, and I’ve switched the lower to a 17×25 TMA as well. This will allow me to spend a few months making minor finishing adjustments.
I also wire tied upper and lower 7-7 to make sure the space doesn’t come back.
Month 22
Wire Progression
Upper: 19×25 SS (Rectangular)
Lower: 16×25 SS (Rectangular)
Bends: Add Bend at UL4 (Upper, ExtrusionStep)
Elastics
Comments
At this point, the spaces have been fully closed. Notice the width development in the upper arch.
I’ve switched from a 19×25 Stainless Steel wire on top to a 19×25 TMA, and I’ve switched the lower to a 17×25 TMA as well. This will allow me to spend a few months making minor finishing adjustments.
I also wire tied upper and lower 7-7 to make sure the space doesn’t come back.
Month 23

Wire Progression
Upper: 19×25 SS (Rectangular)
Lower: 16×25 SS (Rectangular)
Bends: Add Bend at LL2-LR2 (Lower, IntrusionStep)
Elastics
UAW fractured. Replaced and added the bends back to the new one. Added RC influence to LAW.
Took L imp for perm
Comments
At this point, the spaces have been fully closed. Notice the width development in the upper arch.
I’ve switched from a 19×25 Stainless Steel wire on top to a 19×25 TMA, and I’ve switched the lower to a 17×25 TMA as well. This will allow me to spend a few months making minor finishing adjustments.
I also wire tied upper and lower 7-7 to make sure the space doesn’t come back.
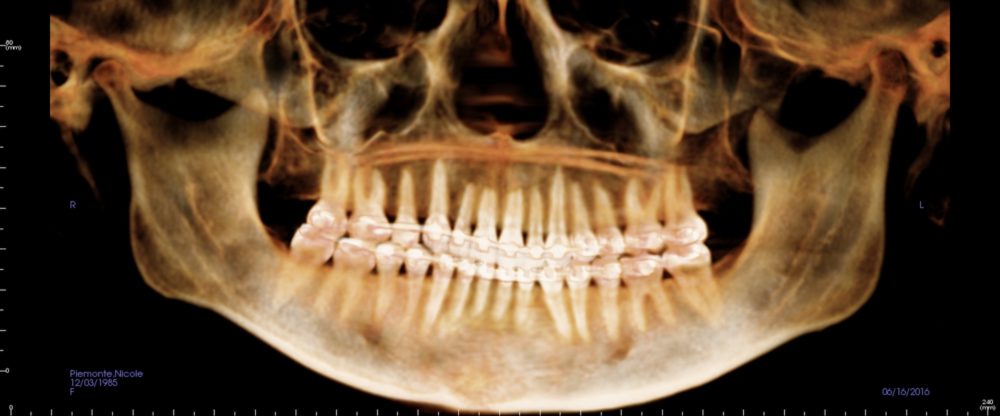
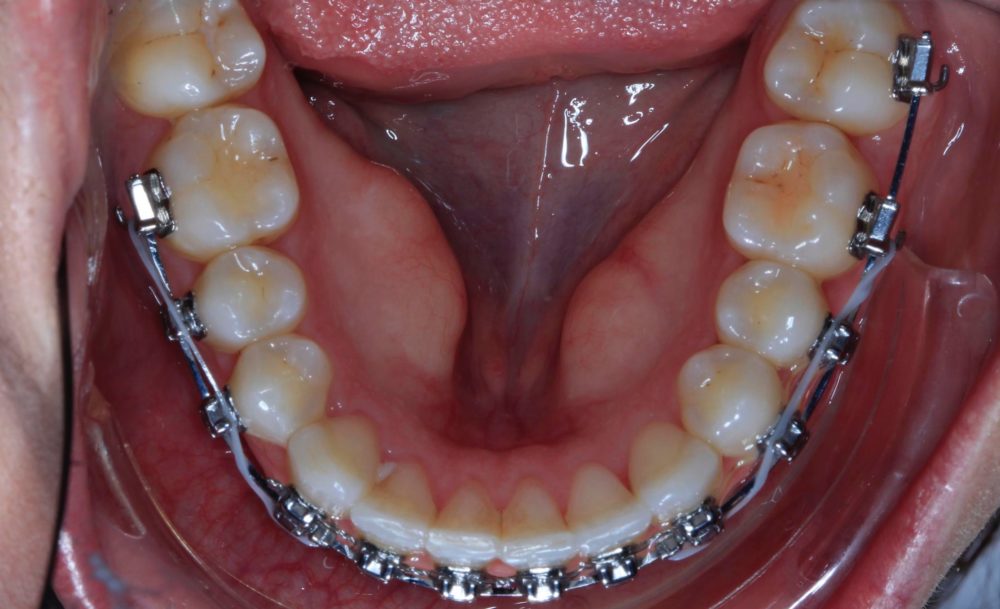
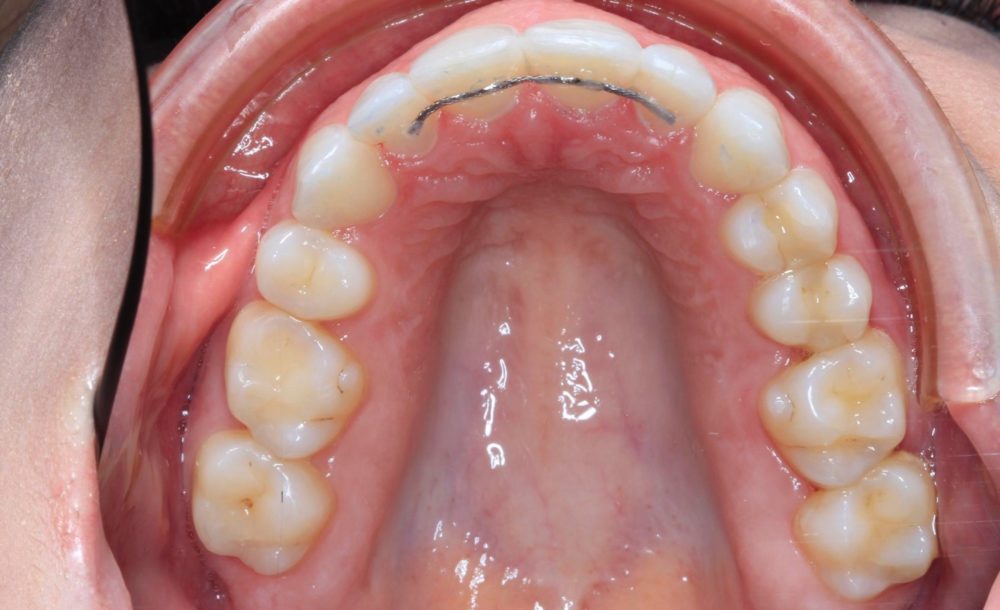
Month 23


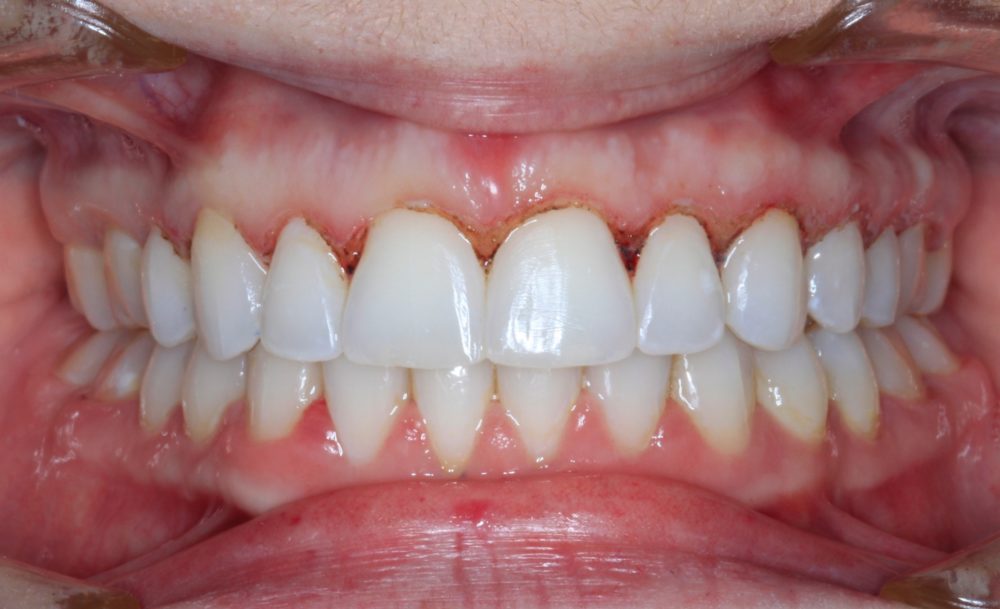
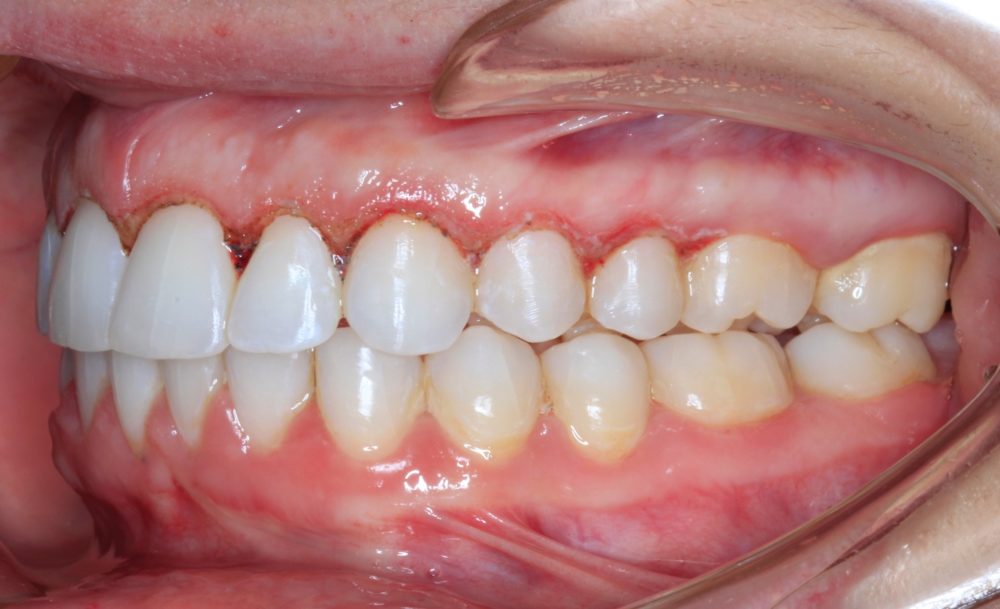
Wire Progression
Debracketing: Debracket
Appliances: Add Lingual Holding Arch Appliance at upper,lower (fulltime), (Bonded), Start day (2017-11-17)
Elastics
- upper 3-3 perm
- Gingevectomy U4-4
- Used topical gel in designated area for 5 minutes
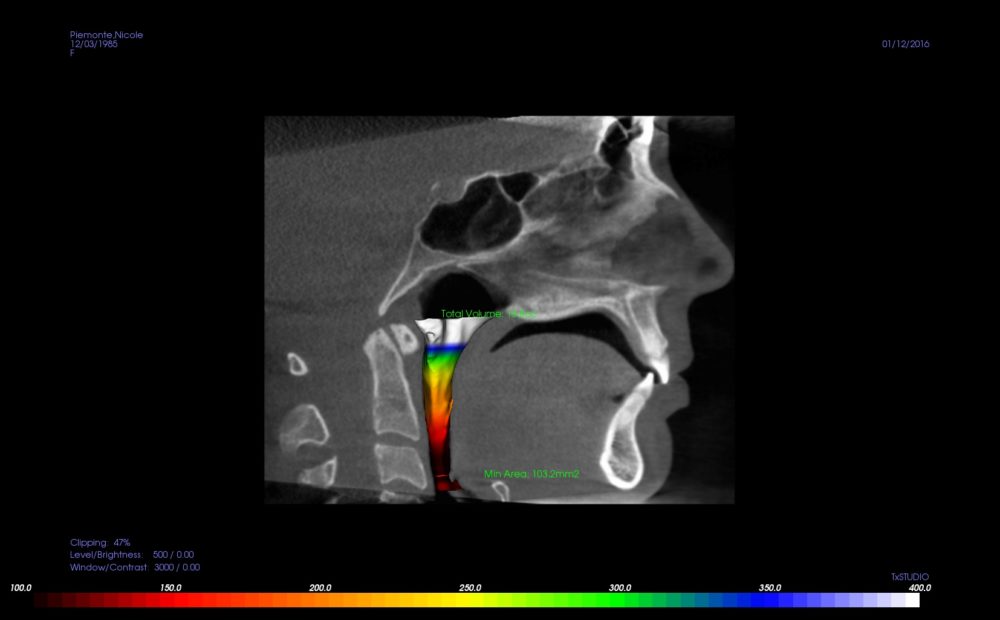
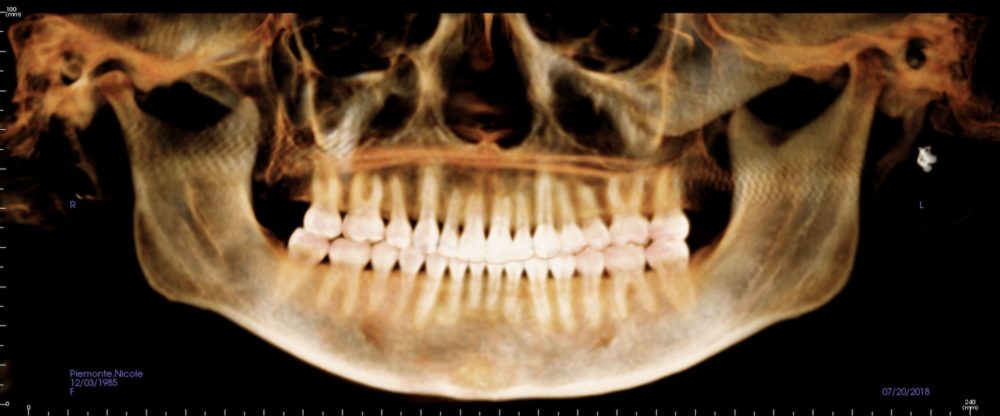
- Took CBCT scan and all photos
Comments
At this point, the spaces have been fully closed. Notice the width development in the upper arch.
I’ve switched from a 19×25 Stainless Steel wire on top to a 19×25 TMA, and I’ve switched the lower to a 17×25 TMA as well. This will allow me to spend a few months making minor finishing adjustments.
I also wire tied upper and lower 7-7 to make sure the space doesn’t come back.
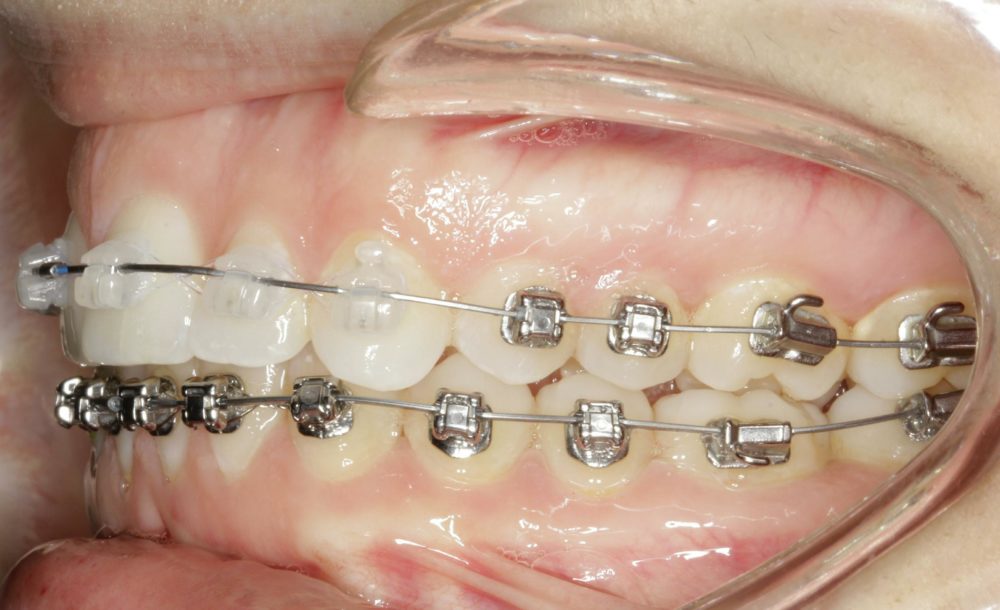
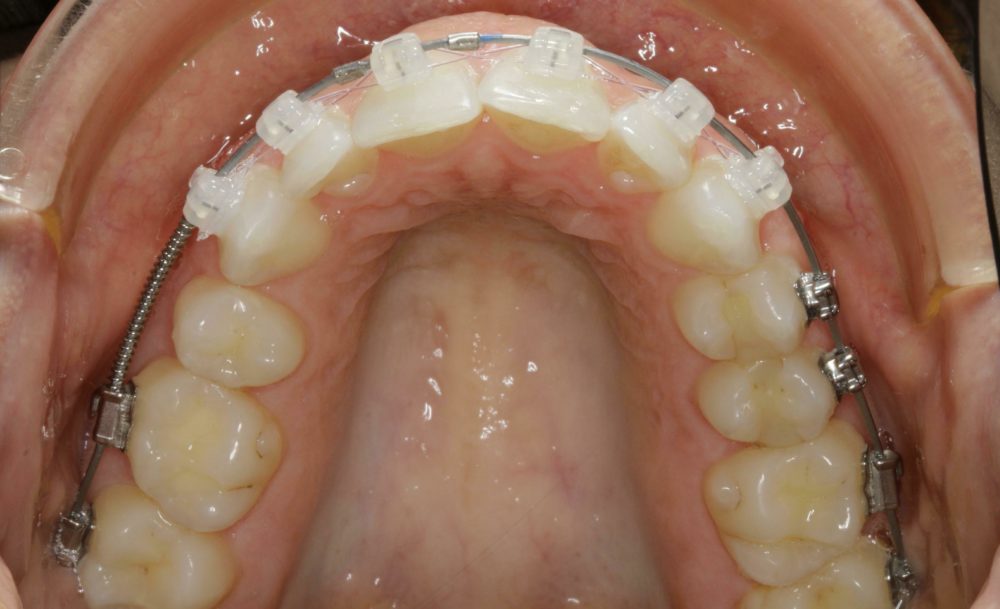
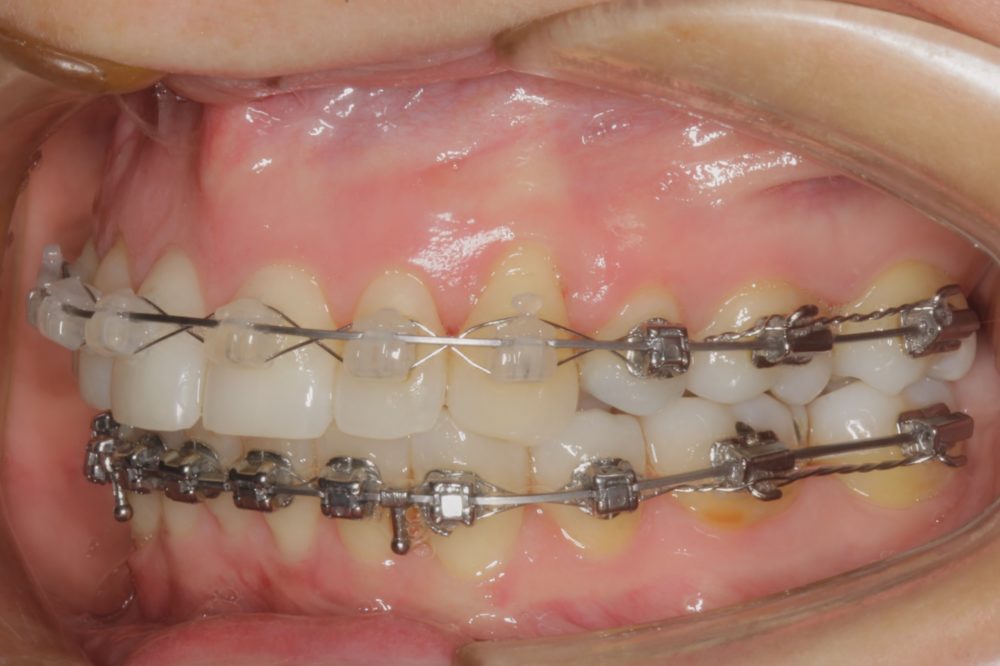
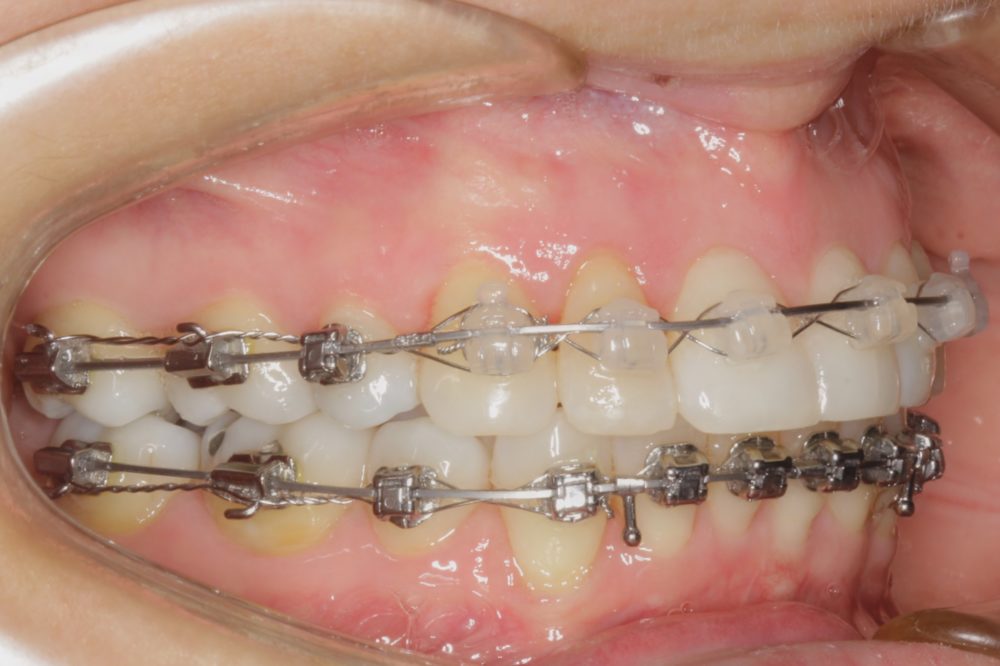
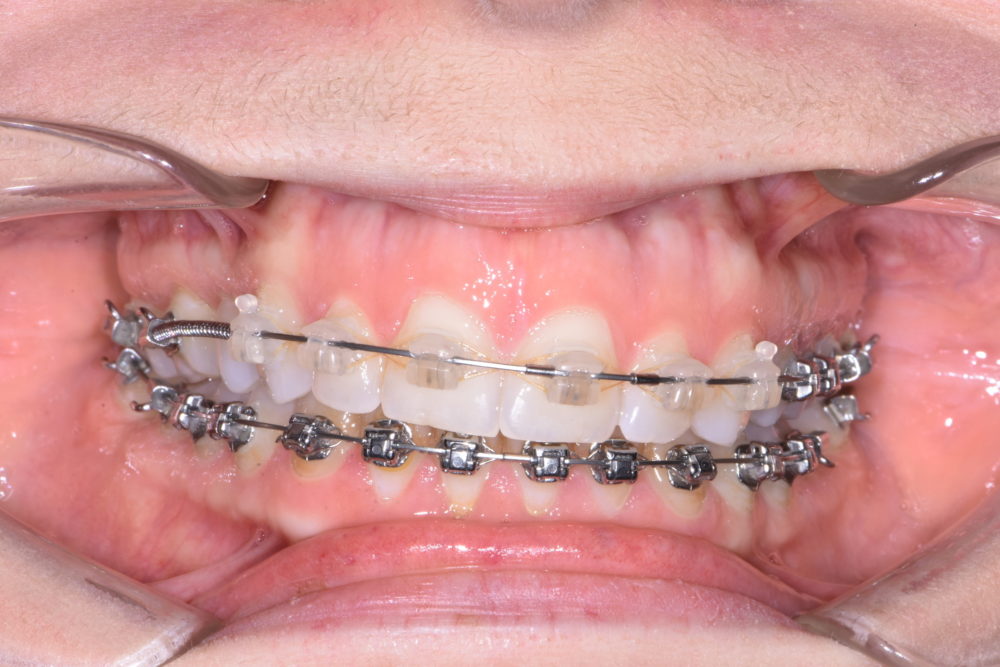
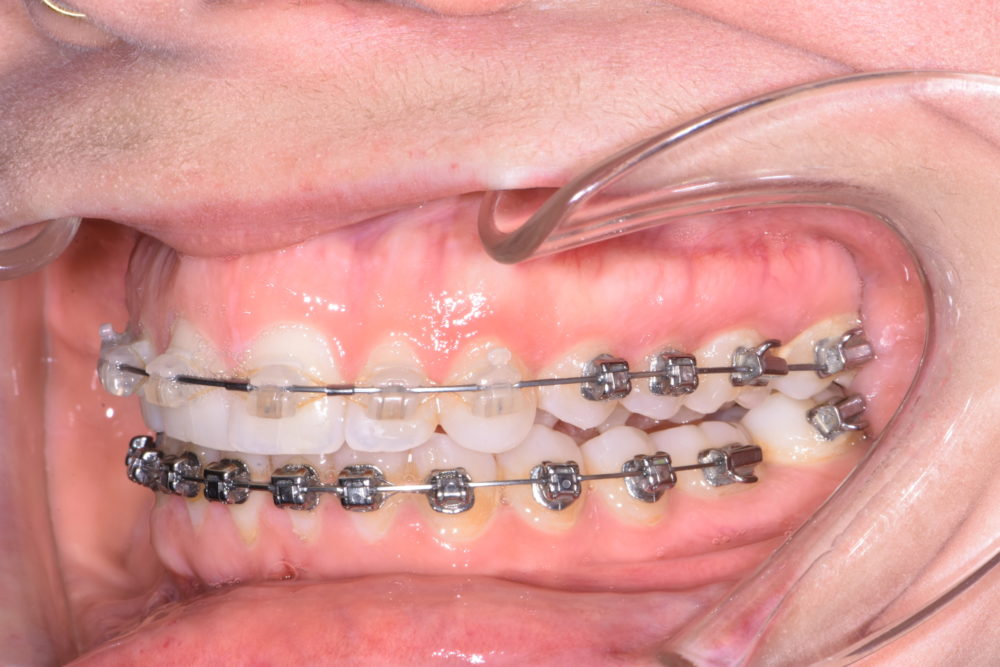
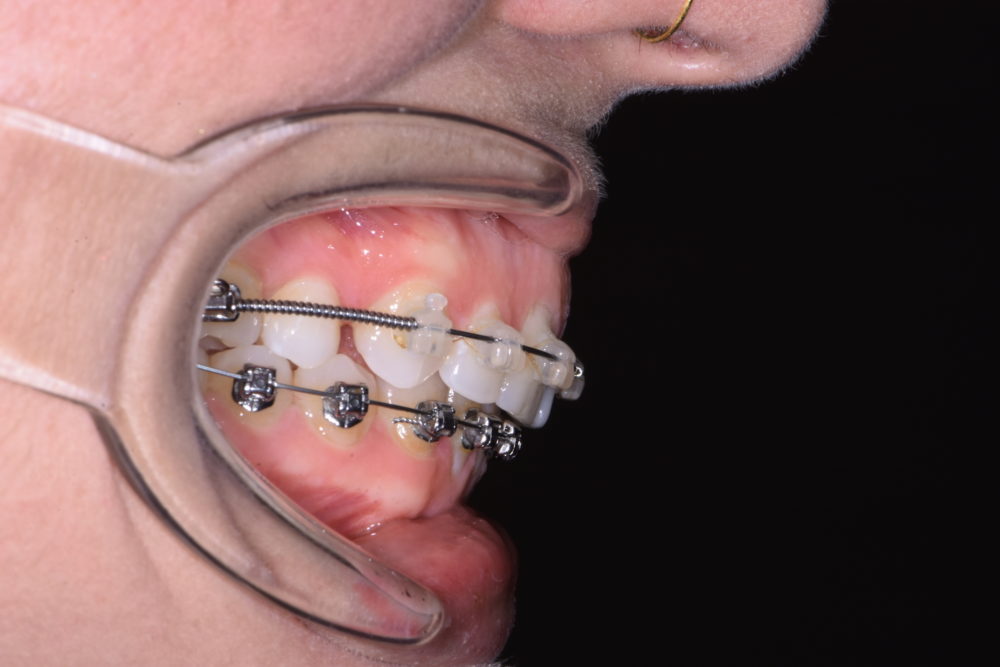
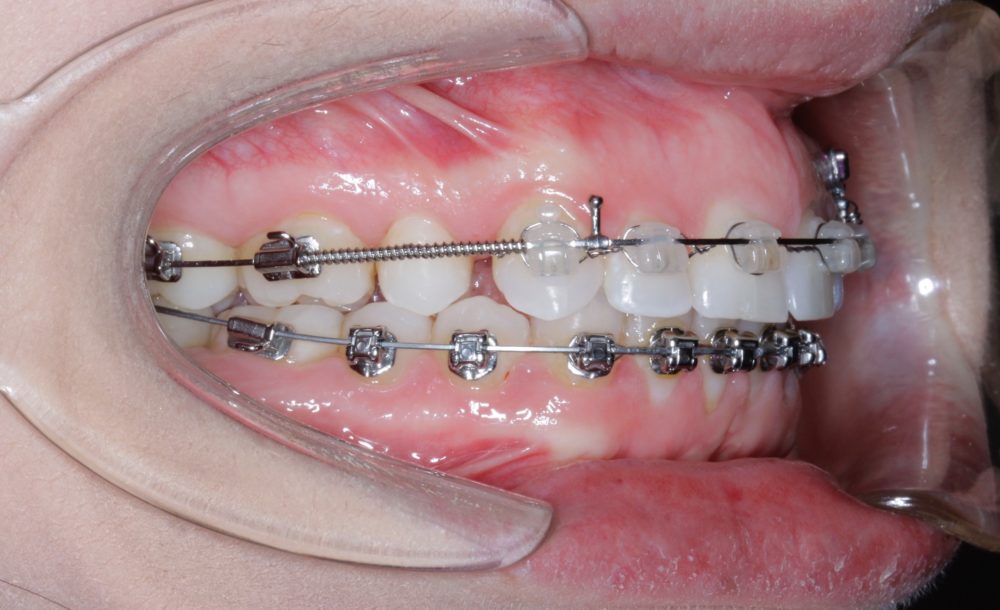
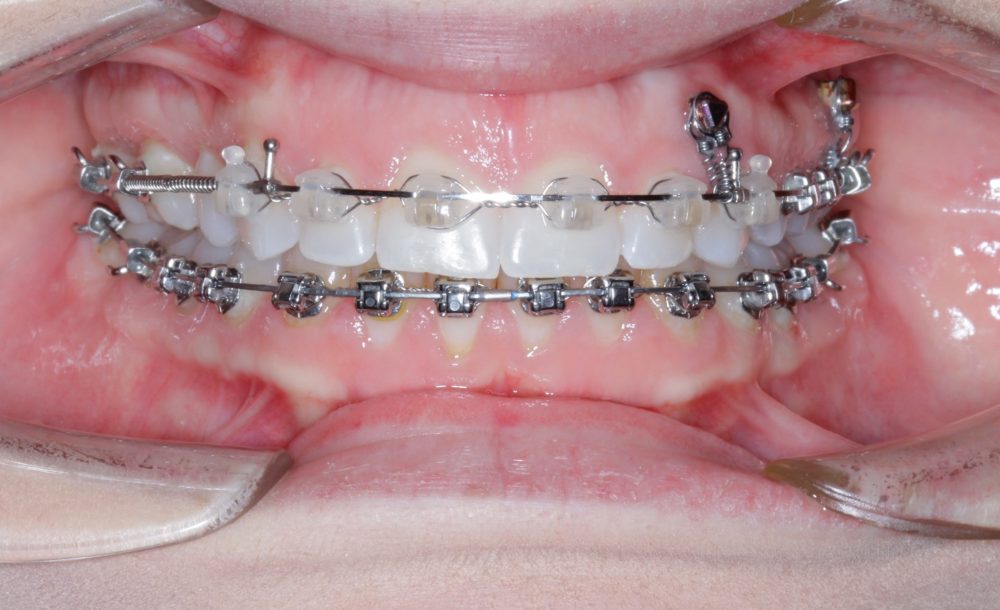
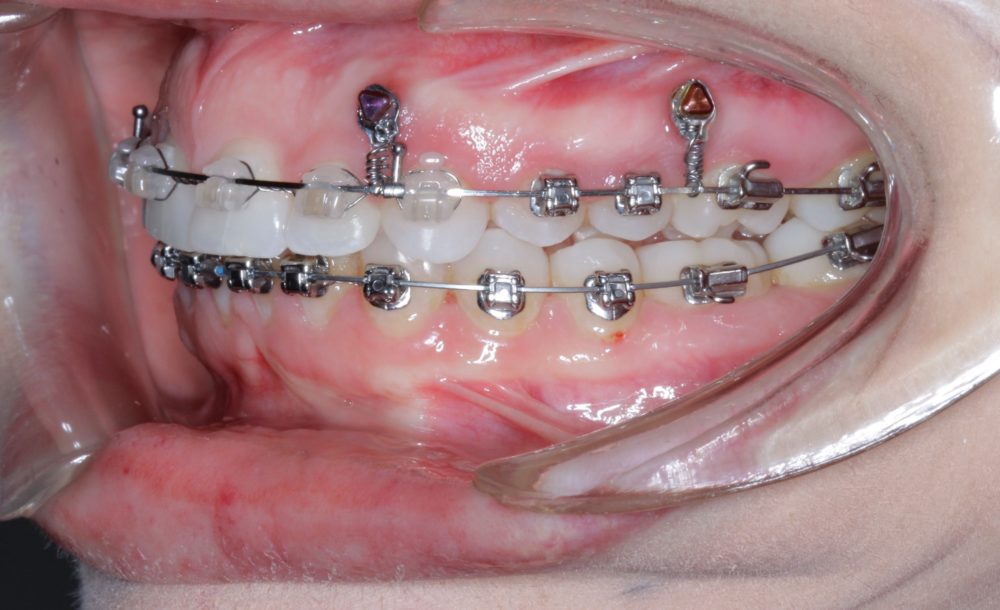
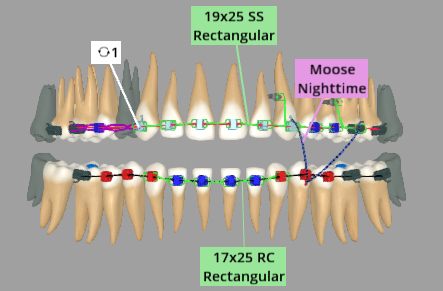
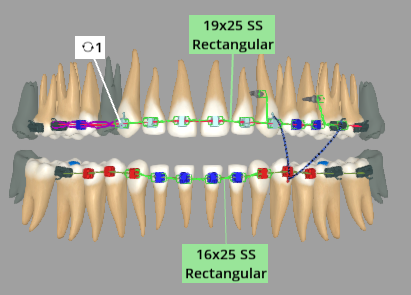
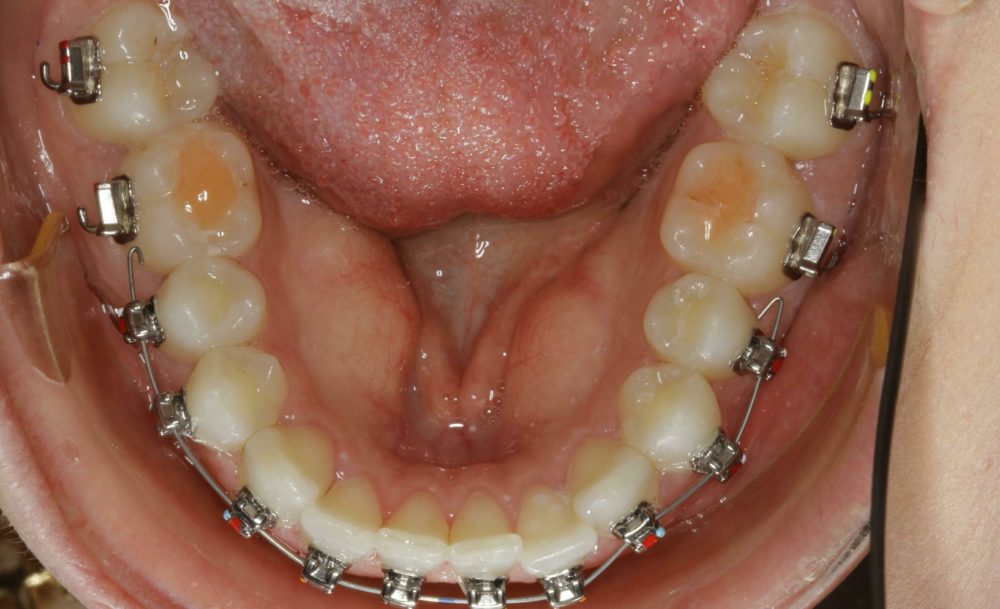
Month 24


Wire Progression
Upper: 19×25 TMA
Lower: 17×25 TMA
Elastics
cl ll at night all w/ Moose
Comments
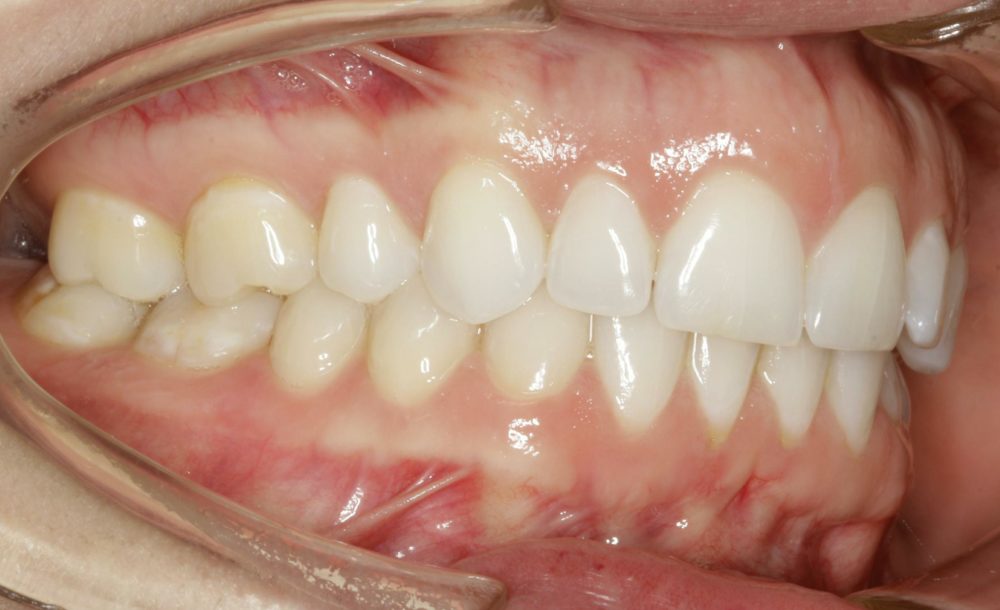
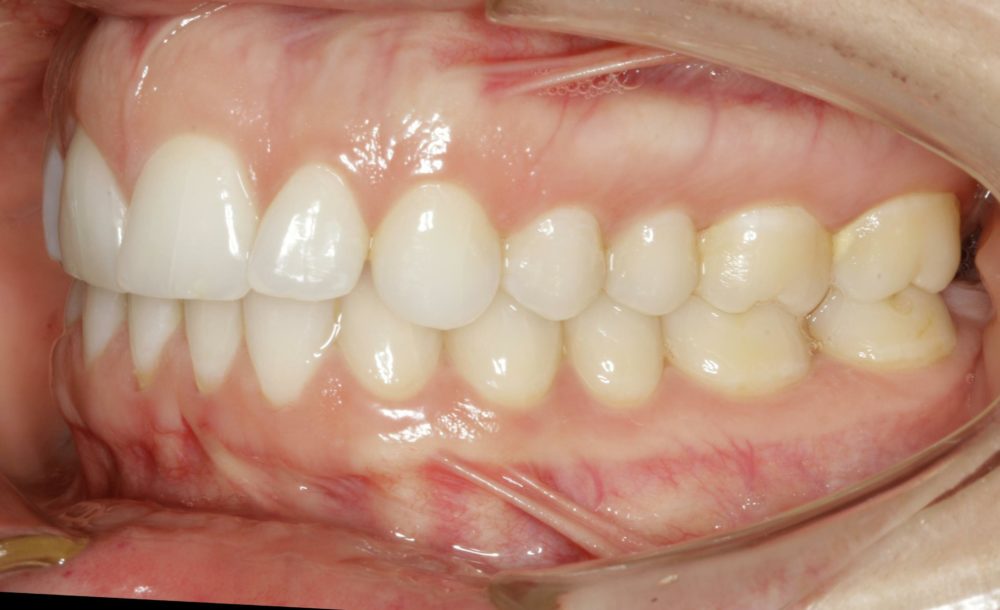
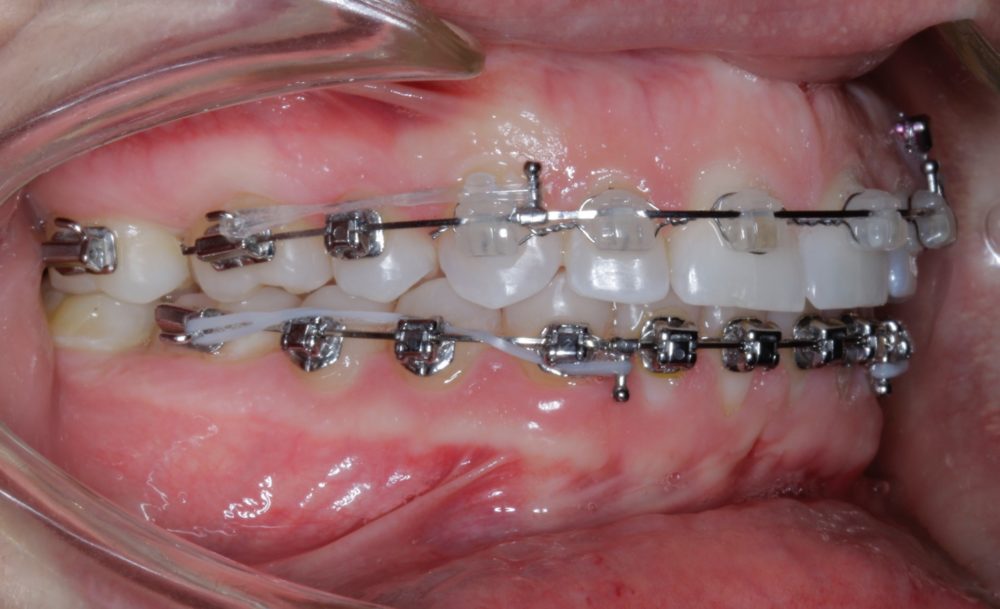
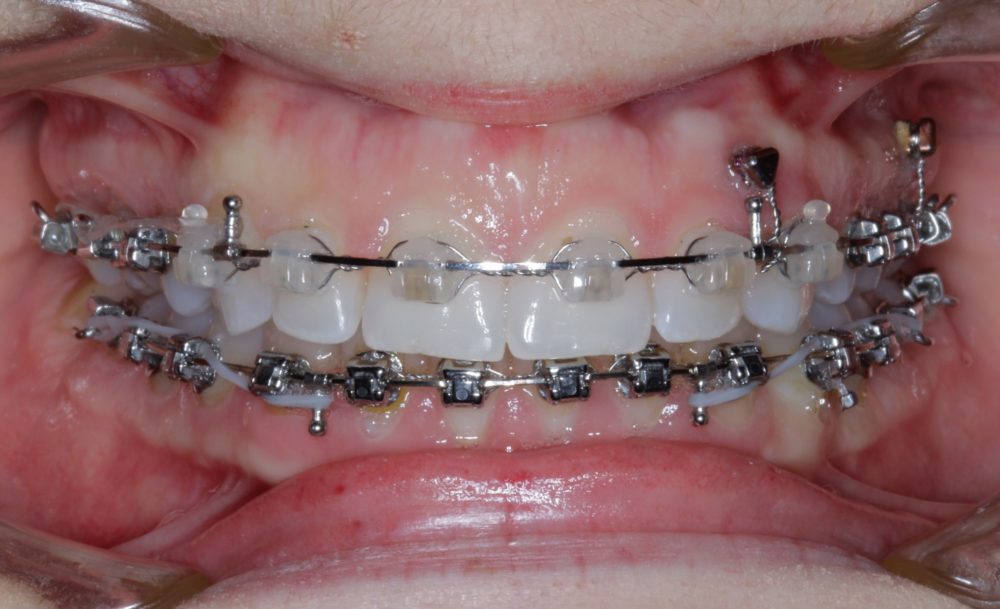
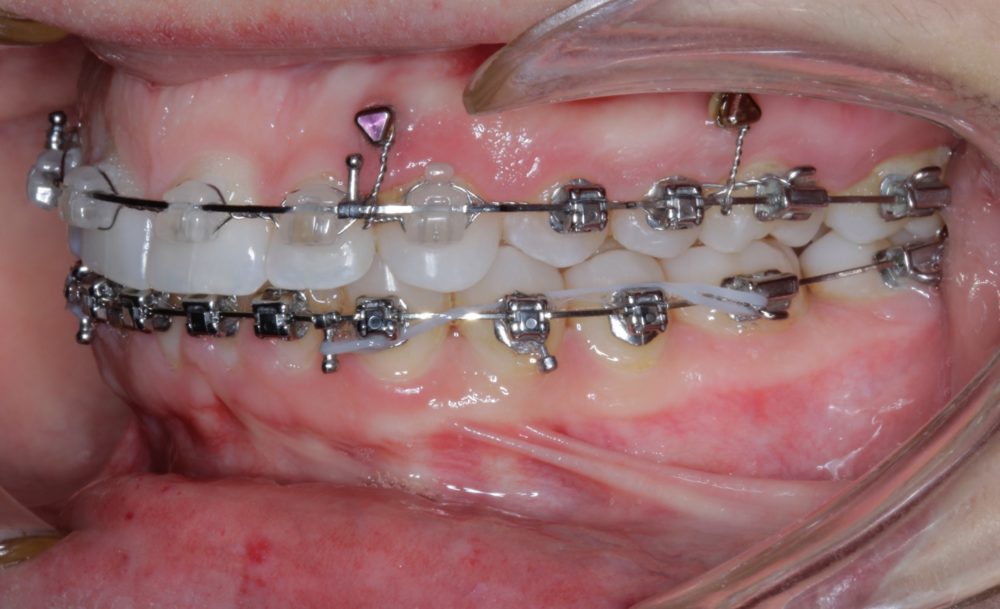
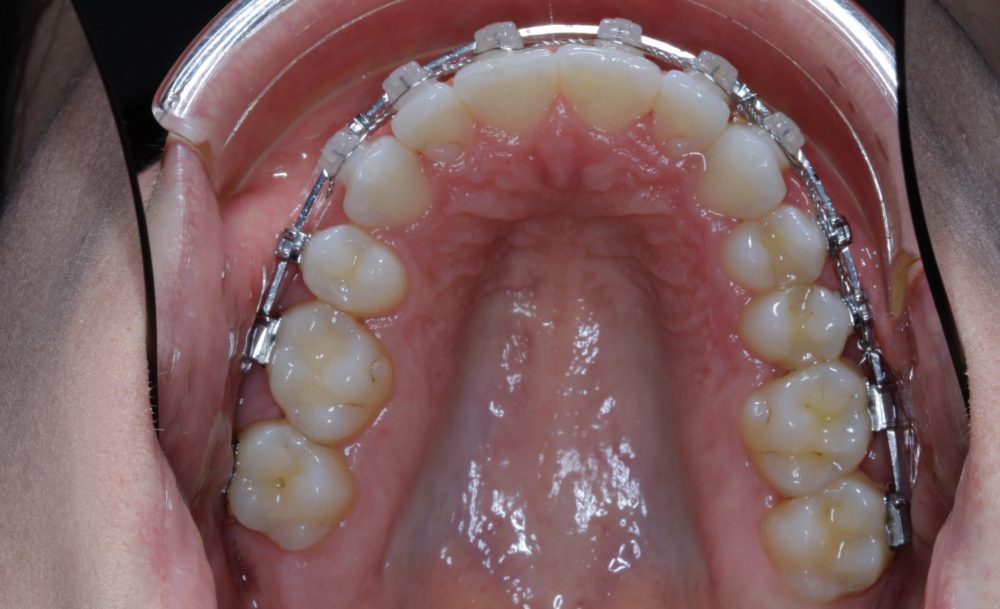
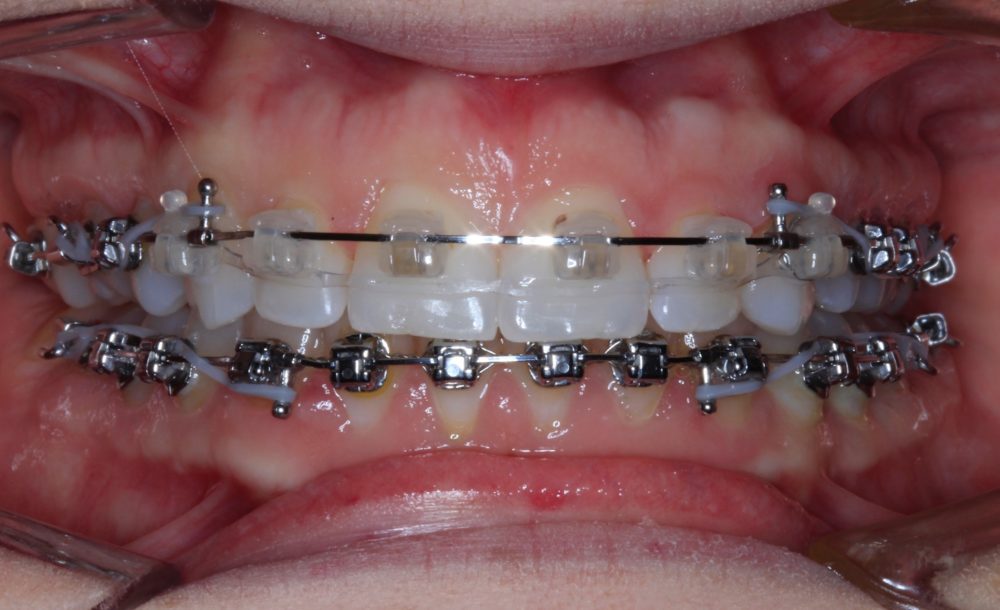
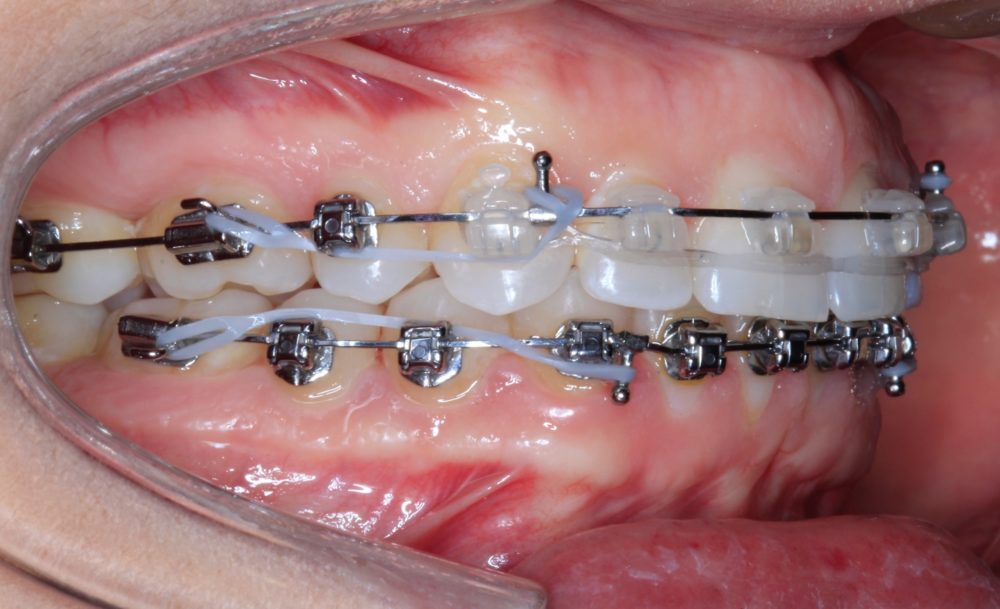
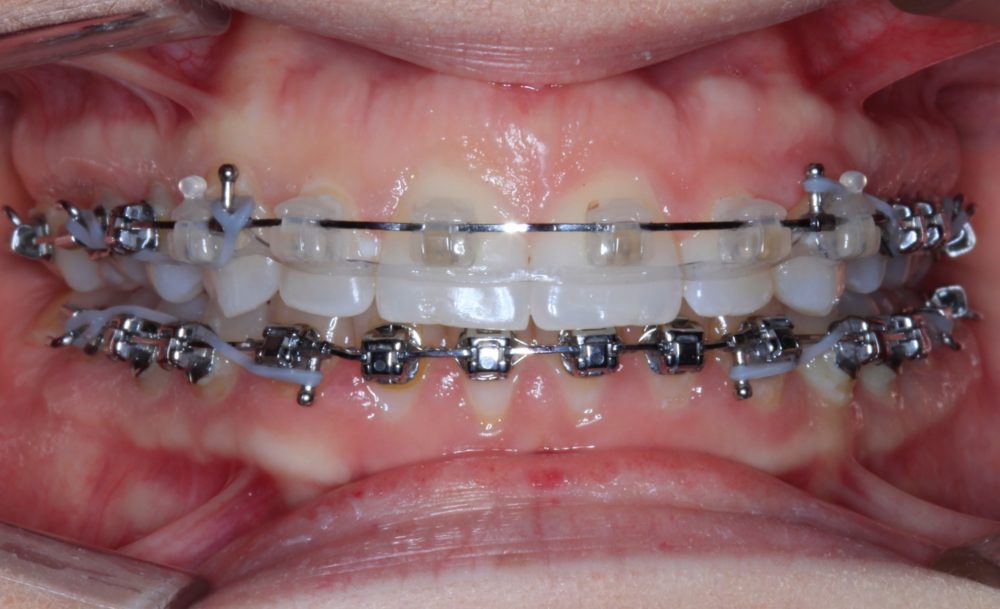
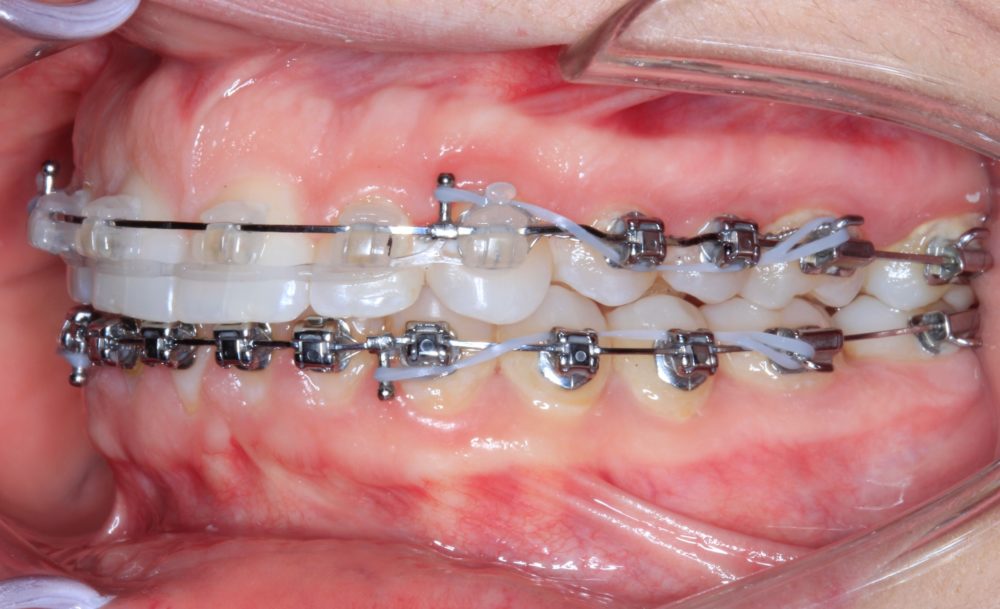
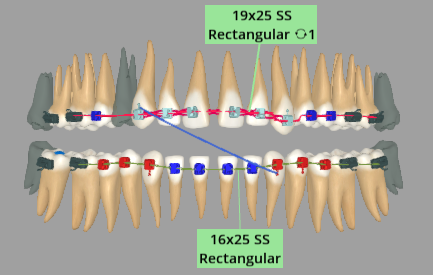
At this point, the spaces have been fully closed. Notice the width development in the upper arch.
I’ve switched from a 19×25 Stainless Steel wire on top to a 19×25 TMA, and I’ve switched the lower to a 17×25 TMA as well. This will allow me to spend a few months making minor finishing adjustments.
I also wire tied upper and lower 7-7 to make sure the space doesn’t come back.
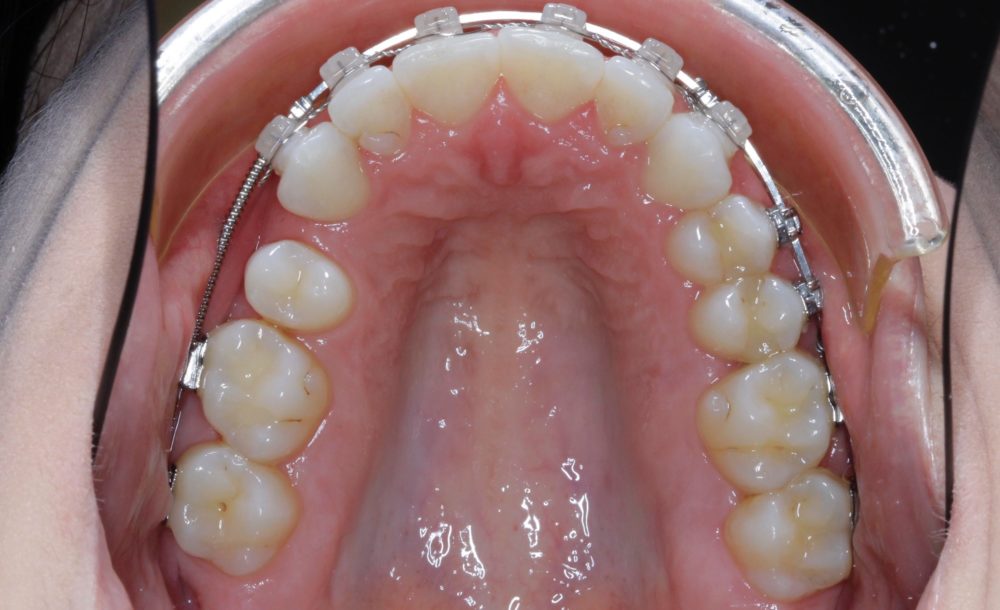
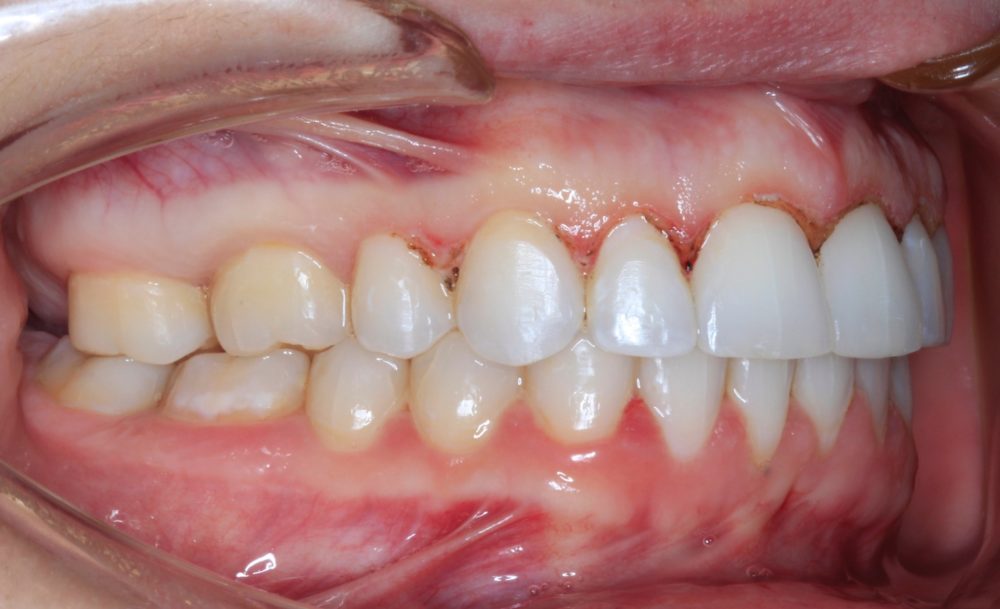
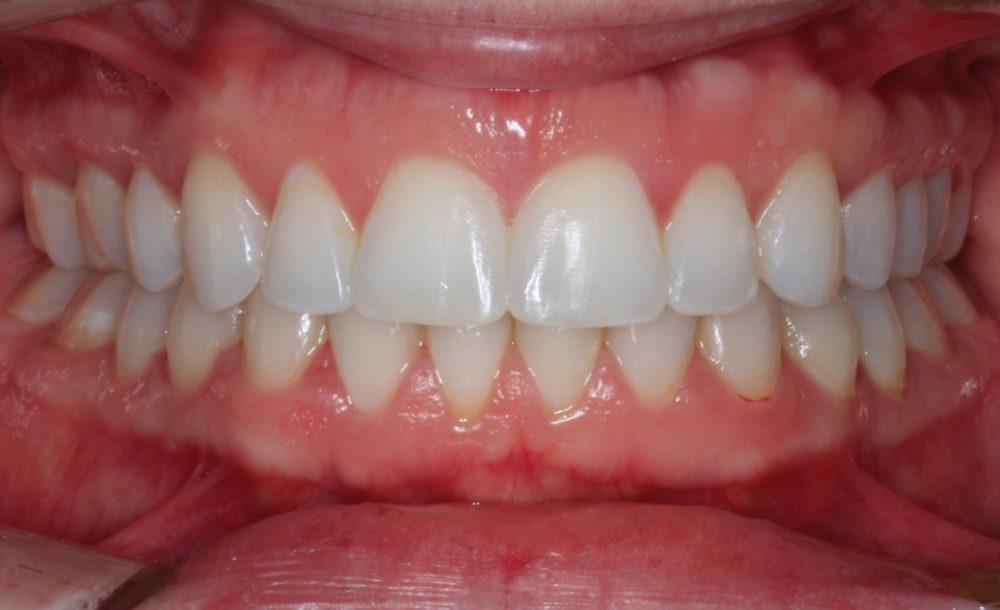
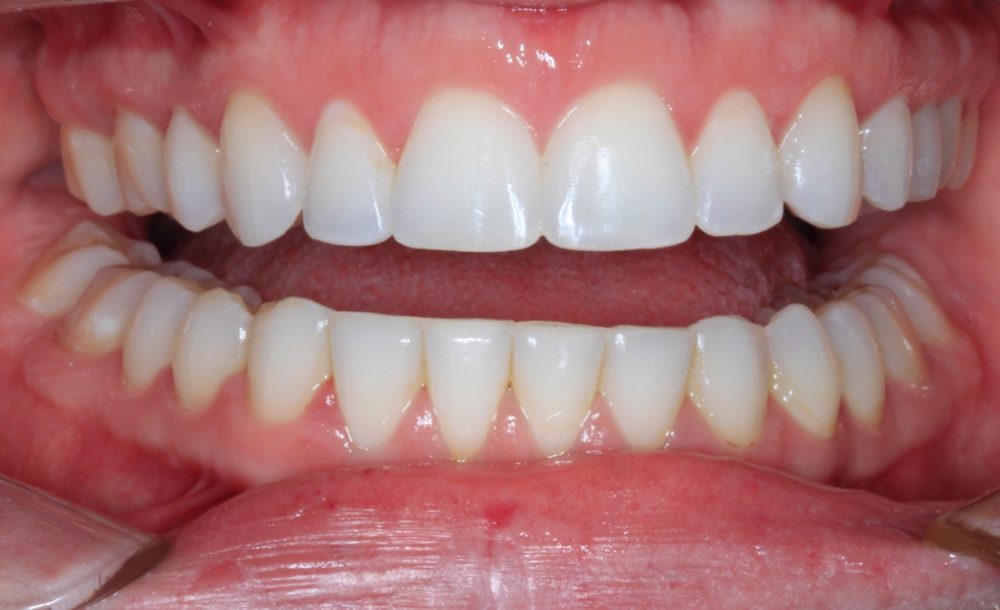
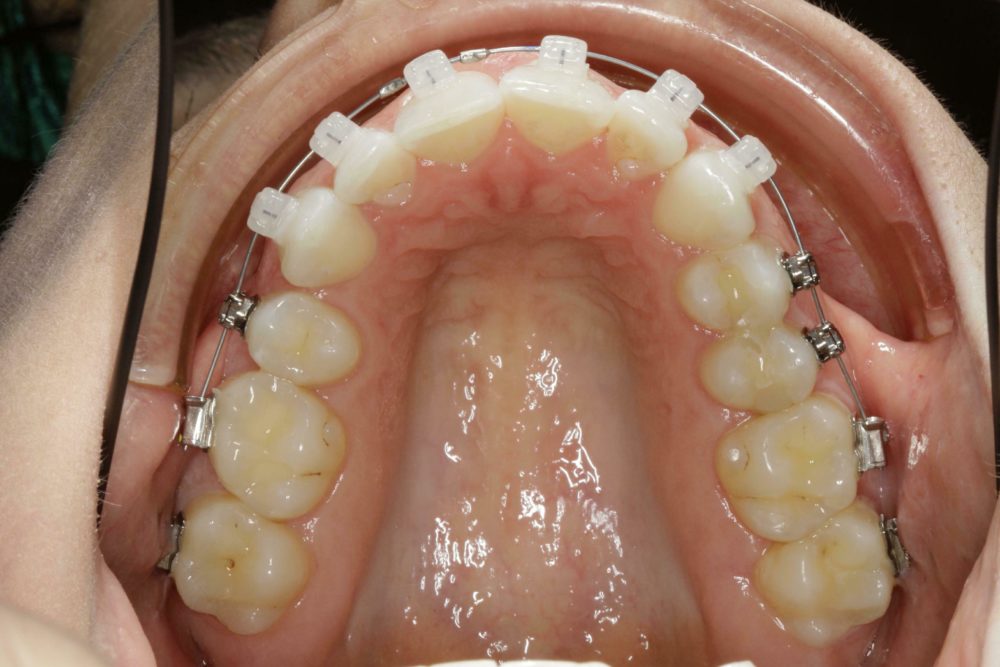
Case Summary
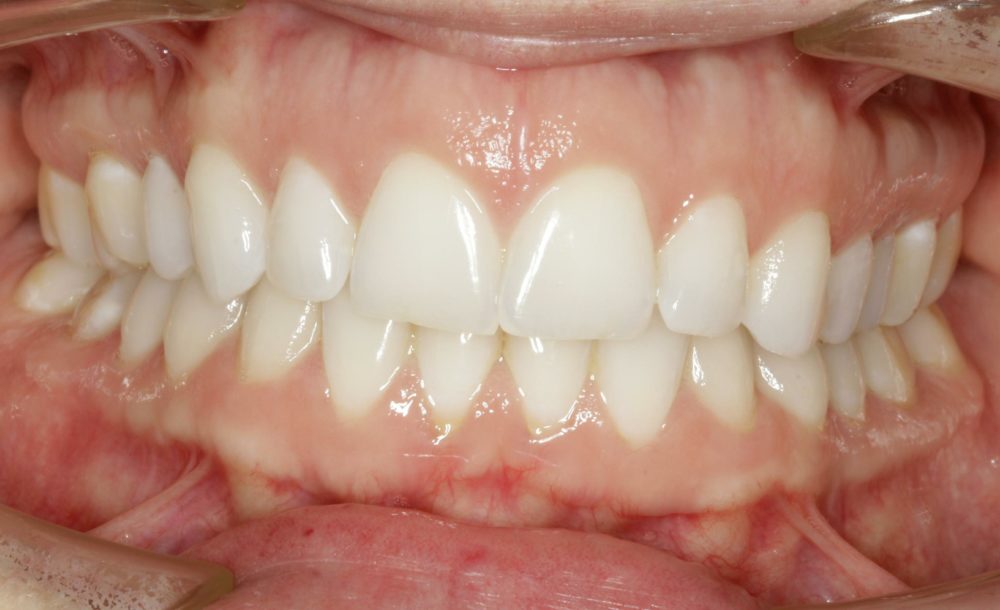
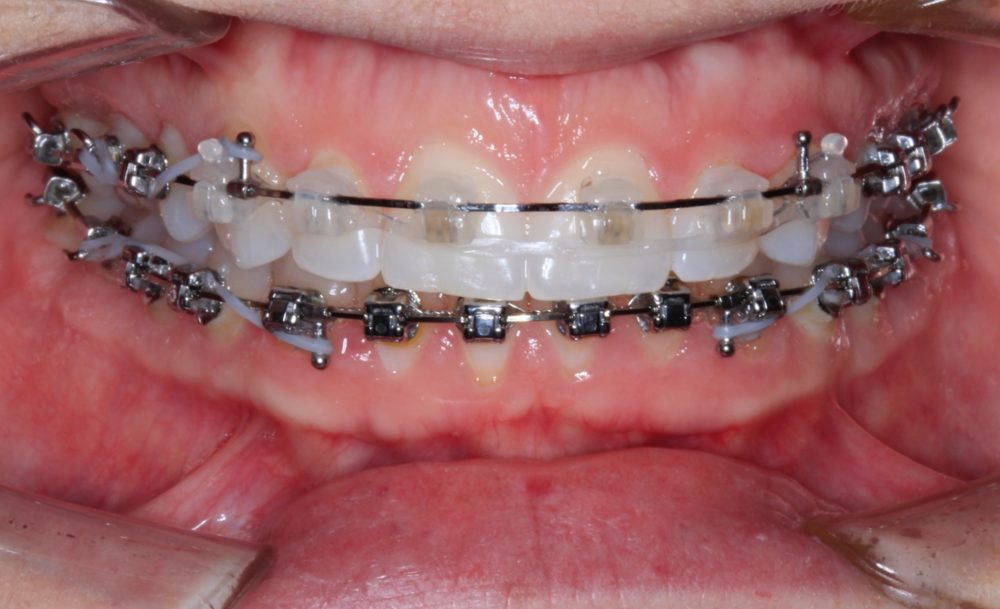
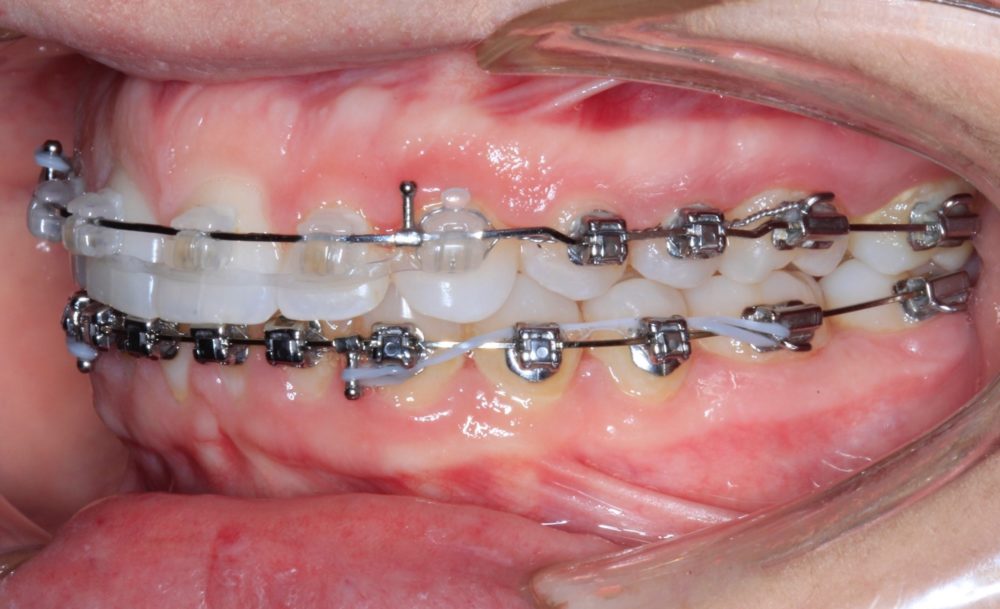
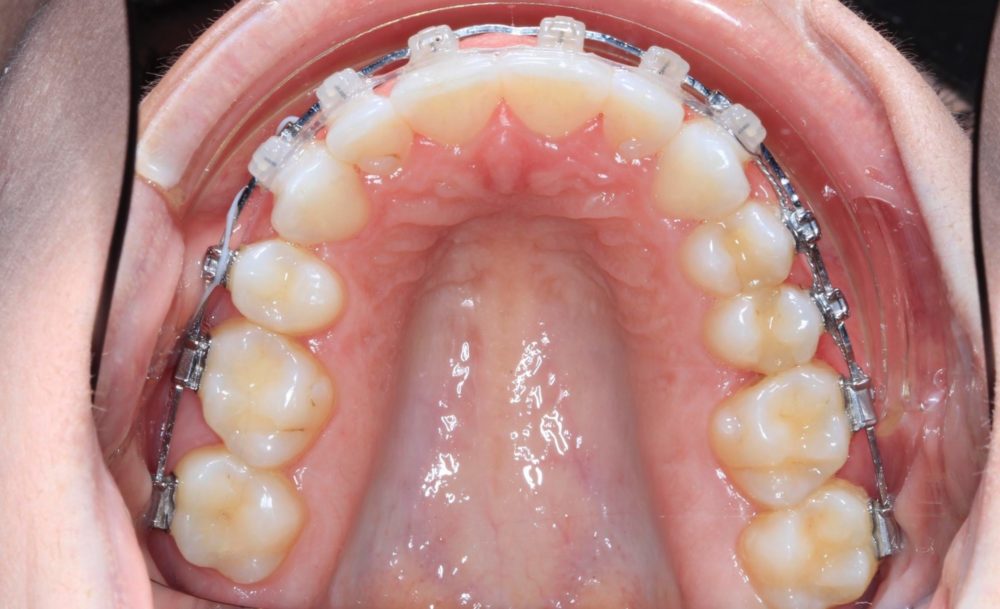
Notice the increase in arch width and the beautiful smile arc. With the increase in arch width, notice that you don’t see as much gum tissue in the posterior!
The day I took her braces off, I handed her a mirror and invited her to look at her new smile. With tears in her eyes, she told me that she “got her smile back”. This is truly why we do what we do. We are here to change peoples’ lives and impact them for the better!